Research from the 2024 IRC (International Residential Code) confirms that guards are required on open-sided walking surfaces more than 30 inches above grade, with a minimum height of 36 inches — and mesh openings cannot allow passage of a 4-inch sphere. Miss either requirement and you'll fail inspection.
This guide covers panel types, material trade-offs, a complete step-by-step installation sequence, the most common failure points, and how to validate your finished railing before it goes into service.
TL;DR
- Wire mesh (hog wire) railing is DIY-friendly, but post spacing, panel sizing, and hardware compatibility must be confirmed before cutting any lumber.
- Mesh openings cannot exceed 4 inches; railing height must meet IRC minimums (36 inches when guards are required).
- Use 6-gauge purpose-built panels rather than agricultural fence rolls, and match hardware metals to prevent galvanic corrosion.
- The sandwich-between-rails method is the most accessible installation for DIYers.
- Treat every cut wire edge before calling the job done; skipping this step is the leading cause of premature rust.
What Is Wire Mesh Deck Railing?
Wire mesh deck railing uses welded or woven metal mesh panels as infill between posts and rails, replacing traditional balusters. The result: preserved sightlines and open views, while still meeting guardrail safety requirements — a combination solid baluster systems can't offer.
Purpose-Built vs. Agricultural Panels
Not all mesh is railing mesh. This distinction matters more than most DIY guides acknowledge.
Purpose-built railing panels (Wild Hog, Trex Select Mesh, Trex Signature Mesh, Feeney DesignRail) are:
- Pre-sized to standard rail spans (36" × 72", 36" × 96", 60" × 72" stair panels)
- Built from 6-gauge welded wire — substantially heavier than farm fence
- Sold with compatible hardware, touch-up paint, and cut-end caps
Agricultural fence rolls (12.5-gauge sheep/goat fence, 14-gauge welded wire rolls) are built for livestock, poultry, and boundary use — not deck railing. Key drawbacks:
- Thinner wire that flexes under lateral pressure
- Opening sizes that often don't meet residential railing code
- No compatible hardware, caps, or railing-specific accessories
Use purpose-built panels for deck railing. The gauge difference alone tells the story: 6-gauge holds its shape rigidly across an 8-foot span; 14-gauge flexes under lateral pressure and looks it.
Where Wire Mesh Railing Fits
Once you've chosen the right panel, aesthetic fit is rarely a problem. Wire mesh works across rustic/ranch, modern farmhouse, lakeside cabin, and contemporary outdoor settings. It pairs with wood, composite, aluminum, or steel post-and-rail systems, which gives it flexibility that cable or glass railing can't always match.
Design and Material Considerations
Panel Material Options
| Material | Best For | Trade-Off |
|---|---|---|
| Zinc + powder-coated steel | Most residential installs; matte black finish | Coating breach at cut ends allows rust; touch-up required |
| 316 stainless steel | Coastal, high-humidity, or harsh environments | Premium cost; starting around $199.99 per panel for stainless options |
| Pre-galvanized steel | Budget-conscious builds in dry climates | Less visual polish; rust-resistance depends on intact zinc layer |
| PVC-coated wire | No purpose-built railing products verified | Not recommended without a manufacturer-specified railing product |
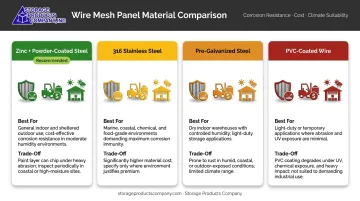
Wild Hog black powder-coated panels (36" × 96") retail around $80–$139 depending on retailer and pack size. For coastal installations, 316 marine-grade stainless — used by Trex Signature and Feeney DesignRail — is the strongest-supported choice.
Feeney specifies a vinyl insert to isolate the stainless mesh from the frame, preventing galvanic corrosion between dissimilar metals — a detail worth confirming before ordering hardware.
Wire Gauge and Span
6-gauge is the verified standard for purpose-built railing panels (Trex Select, Wild Hog, Feeney). This matters across longer spans:
- Feeney specifies a maximum panel width of 6 feet for its mesh system
- Trex offers kits in 6-foot and 8-foot lengths; follow manufacturer span limits rather than assuming any gauge works at any length
- Agricultural wire at 12.5-gauge or 14-gauge is not a substitute — the flex and load resistance simply aren't there
Standard Panel Sizes
Plan post spacing around panel dimensions, not the other way around. Standard verified sizes:
- 36" × 72" — level railing, 6-foot span
- 36" × 96" — level railing, 8-foot span
- 60" × 72" — stair sections
Trex Signature uses different actual dimensions (64" × 32-3/8", 88" × 32-3/8") — match the product system rather than assuming nominal sizes transfer across brands.
Installation Configurations
Choose your method before purchasing materials — each requires different hardware:
- Sandwich between doubled rails — most DIY-accessible; mesh captured between two 2×4s at top and bottom
- Routed channel in single rails — cleaner look, requires a router and precise cuts
- Steel U-track/channel system — faster installation, higher upfront cost
- Drop-in infill for compatible composite/metal systems — limited to specific manufacturer ecosystems
Your configuration choice also needs to satisfy code — the opening size requirements below apply regardless of which method you use.
Code-Driven Design Constraints
Per the 2024 IRC Chapter 3:
- Guards required on surfaces more than 30 inches above grade
- Minimum guard height: 36 inches for residential one- and two-family dwellings
- Maximum opening: must reject a 4-inch diameter sphere across the full panel
- Stair handrails required on flights with four or more risers (IRC R311.7.8); height 34"–38", graspable profile required
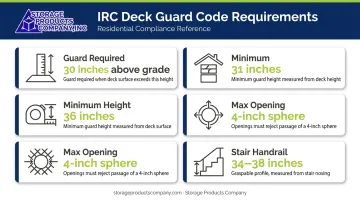
Local codes often exceed IRC minimums. Pull a permit unless your deck clearly meets all IRC R105.2 exemptions: under 200 sq. ft., not more than 30" above grade, not attached to the dwelling, and not serving a required exit. If any of those conditions don't apply, don't assume you're exempt.
Installation Guide for Wire Mesh Deck Railing
Installation follows a prepare → frame → panel → rail → validate sequence. A single 8–12 linear-foot section takes a half-day for an experienced DIYer. A full deck perimeter typically requires a weekend. Have a second person on-site when setting panels.
Prerequisites and Safety Checks
Before touching a saw:
- Post condition: existing posts must be sound, plumb, and anchored with carriage bolts through the rim joist (not face screws). Rotted, out-of-plumb, or surface-screwed posts are a stop-work condition.
- Fastener compatibility: pressure-treated lumber accelerates corrosion on standard zinc-plated screws through copper ion transfer. Use hot-dipped galvanized fasteners conforming to ASTM A153 or stainless Type 304/316 throughout.
- Metal compatibility: stainless mesh paired with zinc-plated screws in wet exposure is a galvanic mismatch. Match hardware metals to panel material, or isolate dissimilar metals as Feeney does with vinyl inserts.
Tools and Materials
Essential tools:
- Miter saw or circular saw
- Drill with bits
- Level, tape measure, speed square
- Bolt cutters or metal-cutting saw (for mesh trimming)
- Clamps (several — you'll use more than you think)
Optional but helpful:
- Kreg jig for hidden pocket screws
- Angle finder for stair rail cuts
Required materials:
- Pressure-treated 2×4 framing lumber (doubled rails) and 2×2 vertical trim
- Carriage bolts and exterior screws (2" screws for frame-to-frame connections)
- Wire mesh panels sized to planned spans
- 5/4 decking board for cap rail
- Touch-up spray paint or rust-inhibiting primer, plus rubber end caps (Wild Hog Hog Tusks for cut 6-gauge ends)
Step-by-Step Installation
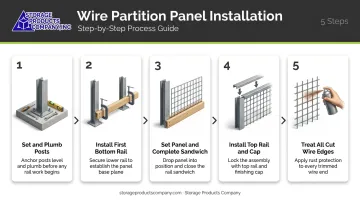
Step 1 — Set and plumb posts Cut posts to final height accounting for cap rail thickness. Confirm plumb on two faces with a level. Secure with carriage bolts through the deck rim joist. Lock in post spacing before fastening permanently, since spacing must align with your panel dimensions.
Step 2 — Install the first bottom rail Attach the first of two doubled 2×4s at 1"–1.5" above the decking surface. Use a scrap spacer block for consistent height across all sections. Pre-drill pilot holes at an angle into posts; clamp rails tight before driving screws.
Step 3 — Set panel and complete the sandwich Slide the mesh panel against the first bottom rail, maintaining a consistent inset with a spacer. Clamp the second 2×4 against the panel and the first rail, pulling boards firmly before screwing. Install 2×2 vertical trim pieces at posts to cover cut wire edges and complete the frame enclosure.
For track systems: cut U-channels to length, fasten to frame, slide panel in, cap the top track per manufacturer instructions.
Step 4 — Install top rail and cap Mirror the bottom frame process to sandwich the top edge of the mesh. Once framing is complete, run the 5/4 cap rail across post tops with 45-degree mitered corners. Install crown-side up so water sheds away from the rail center.
Step 5 — Treat all cut wire edges Apply touch-up paint or rust-inhibiting spray to every exposed cut wire end before the job is done. This step gets skipped regularly and is the primary cause of rust at panel perimeters within the first season.
Post-Installation Validation
Structural checks:
- All posts still plumb after fastening
- All frame-to-post connections tight with no movement
- Cap rail level, no gaps at corners
- Mesh panels show no visible sag or outward bow
Load verification: Per IRC Table R301.5, residential guards must withstand a 200 lb concentrated load at the top rail in any direction, and 50 lb horizontal load on the infill per square foot. Apply firm lateral body-weight pressure at mid-panel and at post tops. Deflection beyond slight resistance warrants re-examination of post anchoring or panel gauge.
Code compliance check:
- Measure railing height from deck surface to top of cap rail (minimum 36")
- Test mesh openings with a 4" diameter object across the full panel — it should not pass through anywhere
- Photograph each section for permit inspection records
Common Installation Problems and Fixes
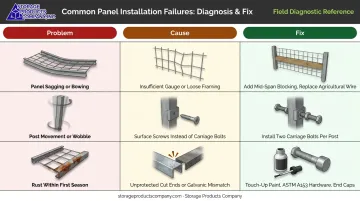
Even well-planned installs produce predictable issues. Catching them early prevents safety problems and rework. The three most common problems — panel sagging, post movement, and early rust — each have a clear fix.
Panel Sagging or Bowing Between Posts
Cause: Wire gauge insufficient for the span, frame rails not pulled tight enough against the panel, or no mid-span blocking on sections over 8 feet.
Fix: Add a horizontal 2×4 block at mid-span on long sections. Re-clamp and re-fasten frame rails if looseness is the issue. Agricultural-grade wire panels should be replaced with purpose-built 6-gauge panels rated for the application.
Post Movement or Wobble After Installation
Cause: Posts anchored with surface screws rather than carriage bolts, or deteriorated rim joist.
Fix: Install a minimum of two carriage bolts per post through the rim joist. If the rim joist is compromised, address that structural repair first — railing can't compensate for a failed framing member.
Rust Appearing Within the First Season
Cause: Cut wire ends left unprotected, incompatible metals causing galvanic corrosion, or under-rated agricultural mesh used in a wet climate.
Three steps address this:
- Apply rust-inhibiting touch-up paint to any already-affected areas
- Replace standard zinc hardware with hot-dipped galvanized (ASTM A153) or stainless fasteners
- Cap all cut wire ends on future installations to prevent moisture intrusion
Pro Tips for a Better Installation
Plan the full perimeter using panel dimensions before cutting lumber. Lay out post spacing so full 6-foot or 8-foot panels drop in without field cuts. This eliminates most trimming, reduces sharp exposed wire edges, and produces a noticeably cleaner finished result.
Pre-assemble sections flat on the deck surface before lifting. Assembling the sandwich frame with the mesh panel on a flat surface makes clamping, squaring, and screwing easier. Once assembled, tip the section up and fasten to posts — fewer hands needed overhead.
Document each phase with photos. Keep product spec sheets on file and confirm local permit requirements before starting. Building officials may ask for proof of code-compliant materials at inspection.
For commercial-grade structures — mezzanines, elevated walkways, multi-level pick modules — wire mesh infill must meet OSHA 29 CFR 1910.29: 200 lb capacity for the top rail, 150 lb for mesh panels and midrails. This is a higher bar than the IRC residential 50 lb infill standard, and it requires PE-stamped drawings and code compliance documentation at permit. Storage Products Company supports mezzanine and elevated platform projects with engineering, structural railing specification, and installation across the Southeast.
Conclusion
Wire mesh deck railing delivers lasting value when the fundamentals are right: proper post anchoring, correct panel material for the climate, and validated code compliance. The difference between a railing that lasts decades and one that corrodes or fails inspection comes down to decisions made before the first screw is driven.
Spend the time upfront — confirm post spacing against panel dimensions, select materials suited to your environment, and treat every cut edge before calling the installation done. Get those details right the first time, and the railing handles decades of weather and load without issue.
Frequently Asked Questions
Is wire deck railing safe?
Wire mesh railing is safe when installed correctly — posts properly anchored with carriage bolts, panels of sufficient gauge (6-gauge purpose-built panels), and mesh openings verified to reject a 4-inch sphere. It meets the same IRC guardrail requirements as any other residential railing system when properly specified and installed.
What is the code for wire deck railing?
The 2024 IRC requires guards on surfaces more than 30 inches above grade, with a minimum height of 36 inches for residential applications. Mesh openings must not allow passage of a 4-inch diameter sphere. Local codes may add requirements — check with your local Authority Having Jurisdiction before starting.
What gauge wire for deck railing?
Purpose-built railing panels use 6-gauge (approximately ¼" thick) welded wire. This gauge provides the rigidity needed to resist lateral loads across standard 6- to 8-foot spans. Agricultural wire at 12.5-gauge or 14-gauge is significantly thinner and not appropriate for deck railing applications.
What are the pros and cons of wire mesh railing?
Pros: Unobstructed views, lower cost than glass or cable, DIY-friendly, wide material options, fire-resistant.
Cons: No privacy or wind blocking, cut edges need corrosion maintenance, and the mesh grid can serve as a climbing surface for young children.
What is the lifespan of a hog wire railing?
Lifespan depends on material and maintenance. Powder-coated panels (Wild Hog, Trex Select) and 316-grade stainless options (Trex Signature) carry manufacturer warranties — confirm current terms and duration directly with the manufacturer for your specific SKU. Galvanized steel lifespan varies by exposure and coating integrity.
Do wire mesh panels sag over time?
Welded wire mesh panels don't sag the way tensioned cable systems can. Panels may flex mid-span if the span exceeds gauge capacity or frame rails weren't clamped tightly, but properly installed 6-gauge panels at manufacturer-specified spans hold their shape long-term.