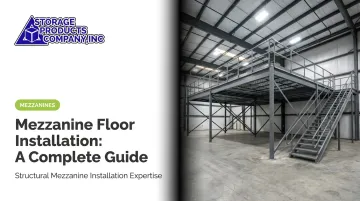
Many facility managers underestimate this complexity. A mezzanine installed without stamped engineering drawings, proper slab assessment, or verified anchor torque may pass visual inspection but fail structurally under load — or fail a formal AHJ inspection weeks after the crew has left. The consequences range from OSHA violations and voided warranties to complete structural rework.
This guide covers the complete, correct installation process: prerequisites, step-by-step assembly sequence, post-installation validation, common problems, and pro tips from experienced installers. Whether you're managing a warehouse expansion in a distribution center or adding production space in a manufacturing facility, this is the process that gets it right the first time.
Key Takeaways
- Confirm 14+ feet of total ceiling height (7 feet clear above and below the deck per IBC) and complete a concrete slab assessment before any work begins
- IBC Section 505.2 limits mezzanine area to one-third of the floor below — stamped engineering drawings and AHJ permits are required before breaking ground
- Installation follows six phases: site prep, structural framing, decking, stairs and guardrails, fire/electrical integration, then final inspection
- Total project timeline: 5–10 weeks from initial planning to operational handover
- Use factory-recommended, insured installers — they carry PE-stamped drawings and know AHJ requirements for your region
Mezzanine Floor Installation Guide
Mezzanine installation consists of five broad phases: preparation and permitting, structural assembly, systems integration, safety feature installation, and validation. Skipping or compressing any phase creates cascading problems — a column that's slightly out of plumb makes every beam connection harder to achieve, and a beam that's slightly unlevel means decking panels won't sit flat. The structure locks in errors from every preceding layer.
Timeline expectations:
- Physical on-site installation for a mid-size industrial mezzanine: 1–3 weeks
- Full project from design through permitting, procurement, and installation: 5–10 weeks
This work requires crews with structural precision skills and direct working knowledge of IBC and OSHA requirements — not general construction labor.
Prerequisites and Safety Considerations
Before a single tool is picked up, confirm all of the following:
Facility requirements:
- Ceiling height: IBC Section 505.2 requires a minimum of 7 feet of clear headroom both above and below the mezzanine deck — meaning most facilities need at least 14 feet of total clear height
- Floor area: Aggregate mezzanine area cannot exceed one-third of the floor area of the room below per IBC 505.2.1
- Structural type selection: Choose between a free-standing structural steel mezzanine or a pallet rack-supported mezzanine based on your load requirements and existing equipment
Concrete slab assessment: Column point loads from a structural mezzanine are highly concentrated. A standard 6-inch reinforced slab is the minimum recommended thickness for warehouse and light industrial facilities per DoD/WBDG UFC guidance — but that doesn't mean any 6-inch slab handles your specific column loads.
Per ACI 360, slab-on-ground design for concentrated loads requires project-specific inputs:
- Post load and load duration
- Column spacing
- Flexural strength of the slab
- Modulus of subgrade reaction
High-load mezzanines frequently require engineer-specified concrete footings. Skip this assessment and slab failure under column loads becomes a real, expensive outcome.
Permits and engineering drawings: Local building authorities (AHJ) require stamped engineering drawings, IBC 505.2 compliance documentation, and often a fire safety assessment before installation can begin. Under IBC 105.1, the owner or authorized agent must obtain the required permit before any construction or alteration.
Storage Products Company addresses this through their Cubic Designs mezzanine partnership. Every Cubic Designs system includes AutoCAD-based space planning and PE-stamped drawings from a licensed, on-staff professional engineer — covering structural load calculations, IBC code compliance, and custom seismic engineering for high-risk jurisdictions.
That documentation is what AHJs need to issue permits. When the same team producing the drawings also manages installation, permit coordination gaps are eliminated before they start.
For pallet rack-supported mezzanines: Existing rack frames must be inspected for load capacity, upright gauge, and structural condition before a mezzanine deck is added on top.
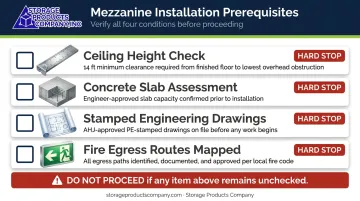
Hard stops — do not proceed if:
- Ceiling height is insufficient
- Slab assessment is incomplete or unapproved
- Engineering drawings are not stamped and AHJ-approved
- Fire egress routes have not been mapped
Tools and Equipment Required
Structural installation tools:
- Anchor bolt systems with calibrated torque wrenches (torque values must match the product-specific ESR — for example, ICC-ES ESR-2713 specifies installation torque and inspection checks for Simpson Titen HD anchors; do not generalize torque values across anchor brands)
- Steel column base plates and beam clamps
- Forklift or VRC material lift for placing heavy structural components at height — no improvised lifting substitutes
Safety and measuring tools:
- Laser level or plumb bob for column alignment verification on two axes
- Chalk lines for layout marking from approved drawings
- Full PPE: hard hats, steel-toed boots, fall arrest harnesses for all elevated work, appropriate gloves
How to Install a Mezzanine Floor (Step-by-Step)
The installation sequence is fixed. Steps cannot be reordered or combined. A structural deviation introduced in Step 1 often doesn't surface until Step 3 or 4, at which point correction costs multiply fast.
Step 1 — Site preparation
Clear the installation footprint completely. Transfer the engineered column grid to the floor using chalk lines and dimensions from the approved drawings. Drill anchor bolt holes at each column base location per the engineering specification.
Inspect the concrete surface for cracks or compromised areas before setting anything. Complete any remediation first — columns go down on sound concrete only.
Step 2 — Column installation
Position base plates at each marked location. Set steel columns and verify plumb on two axes using a laser level before tightening anchor bolts to the specified torque value.
Column plumb is the single most critical checkpoint in the entire installation. Do not proceed to beam work until every column meets tolerance. A column off by even a small margin misaligns beam connections and distributes load unevenly across the whole structure.
Step 3 — Main beam and secondary beam assembly
Lift and connect primary beams across column tops using the specified connection hardware. Install secondary beams or joists at the designed spacing. Torque all bolted connections to manufacturer specification.
Verify beam levelness across the full span before adding any load. Out-of-level beams cause decking fit problems that are tedious and costly to correct after the fact.
Step 4 — Decking installation
Lay decking panels across the secondary beam grid. Common materials include:
| Decking Type | Typical Application |
|---|---|
| Engineered composite (ResinDek MD) | Order picking, sortation, light industrial |
| Steel bar grating | Industrial, maintenance access, fire suppression clearance |
| Chequer plate / tread plate | Heavy industrial, wet environments |
| B-deck with concrete topping | High-load storage |
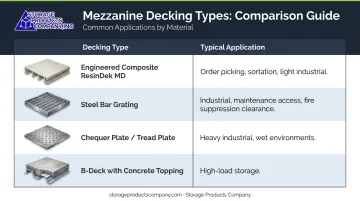
Secure panels per manufacturer requirements and seal or finish all exposed edges. Wet-environment and industrial applications require non-slip surface materials.
Step 5 — Access, egress, and fall protection
Access and fall protection is where most inspection failures originate — get this wrong and the structure can't be occupied. Install stairs at the location(s) specified in the approved design, then address each of the following:
- Guardrails: Minimum 42 inches top rail height along all open edges per OSHA 1910.29; top rails must withstand 200 lb of downward or outward force.
- Toeboards: Minimum 3.5 inches vertical height along all elevated edges (OSHA falling object protection)
- Safety/pallet gates: Required at all goods loading points
- Egress quantity: IBC Chapter 10 Table 1006.2.1 requires two exits above the occupant load threshold. For Group S (storage), that threshold is 29 occupants — not 49. Don't assume the higher threshold applies to warehouse mezzanines.
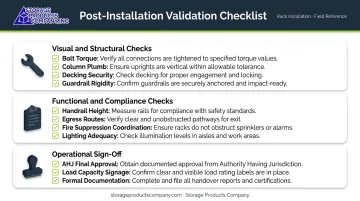
Post-Installation Checks and Validation
Do not put the mezzanine into service until this step is complete. Skipping validation is the most common reason structures fail inspections weeks later — when corrections are far more disruptive and expensive.
Visual and structural checks:
- Walk every section and inspect all bolted connections for correct torque
- Verify column plumb has not shifted during beam installation
- Check that decking panels are fully secured with no movement or flex at seams
- Confirm guardrails are rigid with no play at mounting points
Functional and compliance checks:
- Staircase handrails meet height requirements
- All egress routes are unobstructed and meet IBC Chapter 10 occupancy load requirements
- Fire suppression coverage extends both beneath and above the mezzanine deck (per NFPA, sprinklers are required under fixed obstructions wider than 4 feet — consult your fire protection engineer and AHJ)
- Lighting levels are sufficient for safe operation
Operational sign-off — under IBC 111.1, the structure cannot be used or occupied until the building official issues a certificate of occupancy. Before any personnel or materials go on the mezzanine:
- Obtain final inspection approval from the AHJ
- Post load capacity signage visibly on the structure
- Record formal sign-off documentation before authorizing use
Common Mezzanine Installation Problems and Fixes
Even professionally managed installations hit problems. What separates experienced crews from the rest is how fast they catch issues and what they do about them. The three problems below cover the most common field failures and their correct fixes.
Columns Out of Plumb
Columns that aren't perfectly vertical cause beam connections to misalign and create uneven stress distribution across the structure.
Cause: Base plates were not correctly positioned before anchor bolts were set, or undetected floor variation was not shimmed.
Fix: Stop beam installation. Re-level base plates with precision shims, retighten anchor bolts to spec, and re-verify plumb on both axes with a laser level before continuing.
Insufficient Concrete Slab Capacity
Column base plates showing movement, cracking radiating from anchor points, or visible settlement after initial loading all point to a slab capacity problem.
Cause: Slab thickness or reinforcement was inadequate for column loads. Pre-installation slab and soil analysis was skipped or underestimated.
Fix: Stop all loading immediately. Engage a structural engineer to specify concrete footings at affected locations. Retrofitting is expensive — this is a pre-installation planning failure, and it is exactly why slab assessment is non-negotiable before work begins.
Guardrail or Egress Non-Compliance at Inspection
A mezzanine that fails inspection typically has guardrail height below 42 inches, missing toeboards, or insufficient exits for the occupant load.
Cause: IBC and OSHA requirements were not incorporated correctly into the original design, or the design was modified during installation without rechecking compliance.
Fix: Retrofit guardrails to the 42-inch minimum. Add a second stairway if occupant load thresholds require it. Resubmit for inspection with corrected documentation.
Pro Tips for Installing a Mezzanine Floor Effectively
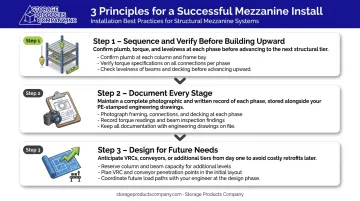
Three principles consistently separate smooth mezzanine installs from costly rework:
Sequence and verify before building upward. Confirm column plumb and anchor torque before touching beams, and confirm beam levelness before laying decking. Each phase locks in the errors of the one before it — getting the foundation right is the highest-leverage action in the project.
Document every stage with photos and records. Capture anchor bolt torque readings, column plumb measurements, and beam connection inspections at each phase. Keep these records alongside the approved engineering drawings — they're essential for AHJ inspections, structural modifications, warranty claims, and facility resale.
Design for future needs from day one. If a VRC material lift, conveyor integration, or additional tier might ever be added, specify those structural provisions in the original design. Retrofitting upgrades to an installed mezzanine costs significantly more than planning for them upfront.
Storage Products Company has delivered mezzanine projects through Cubic Designs for over 40 years, with PE-stamped engineering drawings, permit coordination, and integrated mezzanine-VRC-conveyor project management handled as a single scope. If you're planning integrations, working with an installer who understands the structural implications from the start is where long-term cost avoidance happens.
Conclusion
The quality of a mezzanine installation directly determines its structural safety, code compliance, and operational lifespan. Done right, it's a long-term asset. Cut corners, and you're looking at failed inspections, costly retrofits, and potential liability down the road.
Three practices separate successful projects from problem ones:
- Thorough site assessment and engineering preparation before a single anchor is set
- Disciplined execution with verified checkpoints at each installation phase
- Complete post-installation validation — load testing, inspection sign-off, documentation — before the platform goes into service
For facilities that need PE-stamped drawings, full project management, and experienced installation crews, Storage Products Company provides all three as part of a single-source engagement — so each stage is handled by people who've done it before.
Frequently Asked Questions
How much does mezzanine floor installation cost?
Budget ranges typically run $40–$250 per square foot depending on size, type (free-standing structural vs. rack-supported), and decking material. Permits, stamped engineering drawings, stairs, safety gates, and fire system coordination add to the base price. Final cost requires a project-specific quote.
How long does it take to install a mezzanine floor?
Physical installation of a standard warehouse mezzanine typically takes 1–3 weeks on site. The full project timeline, from initial design and permitting through procurement and installation, commonly runs 5–10 weeks depending on size, complexity, and AHJ review timelines.
Do mezzanines require building code approval?
Yes. In the US, mezzanine installations must comply with IBC Section 505.2 and require stamped engineering drawings and approval from the local Authority Having Jurisdiction (AHJ) before installation begins. Fire safety and egress compliance are also reviewed as part of the permit process.
How much weight can a steel mezzanine hold?
Load capacity is determined by the engineered design and varies by application. OSHA 1910.22 requires that walking-working surfaces support the maximum intended load for that surface. The specific rated capacity must be calculated by a structural engineer and posted visibly on the structure.
What is the minimum clear height below a mezzanine floor?
IBC Section 505.2 requires a minimum of 7 feet of clear headroom both above and below the mezzanine deck. Most facilities need at least 14 feet of total ceiling height to accommodate a mezzanine with usable space on both levels.
Do mezzanines require two exits?
Under IBC Chapter 10 Table 1006.2.1, the single-exit threshold is 29 occupants for Group S (storage) and 49 for B, F, and M occupancies. Occupant load must be assessed during the design phase, before permits are submitted.