This guide covers everything a warehouse manager, operations team, or facility planner needs to know: prerequisites, the full installation sequence, common problems and fixes, and when to call in professional installers rather than handling it in-house.
Experienced in-house maintenance teams can realistically handle smaller systems with the right tools and preparation. For taller systems with uprights above 15 feet, high-capacity configurations, or installations in jurisdictions with permitting requirements, trained and insured installers are the appropriate choice.
Key Takeaways
- Plan before you build: floor condition, ceiling height, arm spacing, and upright capacity must be calculated before any components are assembled
- Installation follows a strict sequence: site prep → base and column assembly → anchoring → bracing → arms → validation
- Concrete slab anchoring is mandatory; non-concrete surfaces are not approved for cantilever rack installation
- Post-installation validation (plumb, level, torque) must happen before any product is loaded
- Large-scale, high-bay, or permit-required installations should use professional installers
Cantilever Rack Installation Guide
Cantilever rack installation is unforgiving of improvisation. The process follows a fixed sequence — site preparation, component assembly, anchoring, bracing, arm installation, and validation — and skipping or reordering steps creates structural problems that typically require partial disassembly to fix.
Expect a single starter bay to take a capable two-person team several hours. A multi-bay system can fill a full day or more. You'll need hands-on mechanical experience, familiarity with torque specifications, and confidence using power tools.
Prerequisites and Safety Considerations
Floor readiness comes first. The concrete slab must be structurally sound, reasonably level, and free of damage or subsidence. Anchor manufacturer specifications (such as the Simpson Strong-Bolt 2 ESR-3037) document performance across concrete compressive strengths from 2,500 psi to 8,500 psi — your specific requirement depends on the anchor selected, the load case, and your engineered drawings. No drawings? Get them before drilling a single hole.
Ceiling height and sprinkler clearance set your usable storage height. OSHA 29 CFR 1910.159(c)(10) requires a minimum 18 inches of vertical clearance between the top of storage and standard sprinkler deflectors; ESFR sprinkler systems require 36 inches. Account for forklift reach limits and overhead obstacles before finalizing upright height.
Compliance and permitting are non-negotiable. Cantilever rack design and utilization in the US is governed by ANSI MH16.3 — the current standard for industrial steel cantilevered storage racks. Taller or high-capacity systems may require local building permits, especially in seismic zones where ASCE 7 design requirements apply. Check with your local Authority Having Jurisdiction (AHJ) before installation begins.
These rules apply to every installation, without exception:
- Non-concrete surfaces are not approved for cantilever rack installation
- Shimming, when required, must use steel plates at least as wide as the base footprint — never wood or plastic
- Inspect all components against the packing list before starting; do not proceed with missing or damaged parts
- Working from a professional layout plan (AutoCAD drawings showing column placement, aisle widths, and load distribution) before installation day catches problems before they become expensive mid-project corrections
With prerequisites confirmed, you can pull together the tools and components you'll need on installation day.
Tools and Parts Required
Essential tools:
- Electric impact wrench and impact-rated sockets
- Torque wrench (for final torque verification — not optional)
- Straight-line laser or chalk line
- Tape measure and black permanent marker
- Plumb bob or laser level for column alignment
Essential components:
- Base plates and columns (uprights)
- Arms — straight for stable loads like lumber and sheet goods; inclined for cylindrical items like pipe or tubing
- Horizontal bracing sets
- X-bracing (required per engineered drawings, commonly specified for taller uprights)
- Wedge anchors in the diameter and embedment depth specified by your project drawings
- Steel shim plates
- All manufacturer-supplied hardware (verify part numbers against the packing list)
- Safety gear: gloves, safety glasses, and hard hat — required throughout
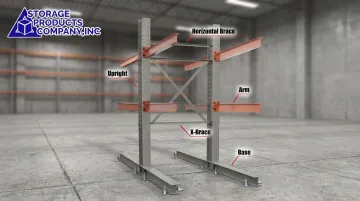
Arm accessories like pipe stops and arm lips are optional for many loads, but strongly recommended for anything cylindrical or likely to roll. Installing them during initial assembly is far easier than retrofitting under a loaded system.
How to Install Cantilever Racking: Step-by-Step
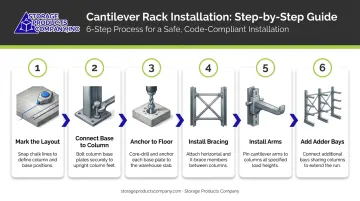
Step 1 — Mark the Layout
Snap chalk lines or use a straight-line laser to mark the main aisle centerline and each base footprint on the floor. Accuracy here prevents cascading misalignment across every bay that follows.
Step 2 — Connect Base to Column
Lay the starter bay out on the floor and connect the base to the column using manufacturer-supplied hardware. Torque all bolts to the specification on your manufacturer drawings. Reference torque values vary by bolt grade: Grade 8 bolts at 1/2" run approximately 106 ft-lb dry; 5/8" require approximately 212 ft-lb. Steel King's cantilever manual specifies 60 ft-lb and 120 ft-lb for typical Grade 5 hardware at those diameters.
The governing spec is always the manufacturer's drawings for your specific system. Never substitute torque values across bolt grades without manufacturer approval.
Step 3 — Anchor to the Floor
Position the base assembly on the marked footprint. Drill anchor holes and install wedge anchors into the concrete slab at the embedment depth specified by your anchor manufacturer and project drawings. Stagger anchor placement within the base for maximum stability. Typical anchor counts by system type:
- Light and standard duty bases: 2–3 anchors per base
- I-Beam cantilever bases (single-sided): 3 anchors per base
- I-Beam cantilever bases (double-sided): up to 5 anchors per base
Use steel shims under the base as needed to achieve level before final torque.
Step 4 — Install Bracing
Connect horizontal bracing between columns once both uprights are standing. Tighten structural connectors to snug-tight using your impact wrench — no gaps should remain between connected components. Where engineered drawings specify X-bracing, install it at this stage. X-bracing provides critical lateral resistance for taller configurations. Skipping it on a tall bay isn't a shortcut — it's a collapse risk.
Step 5 — Install Arms
Work from the bottom level upward. Attach each arm using the supplied hardware, typically four bolts per arm. Before moving to the next arm, confirm:
- Each arm is level
- Pipe stops or arm lips are installed where required by load type or design spec
- Arm length exceeds product depth by at least 1–2 inches to maintain rated capacity
Step 6 — Adder Bays
Repeat the process for each additional bay. Before loading anything, confirm all adjoining columns sit at the same height and that cross-bay bracing connections are fully secured.
Post-Installation Checks and Validation
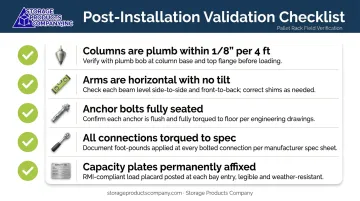
Never load the system before completing these checks:
Visual and structural verification:
- All columns are plumb — RMI/ANSI MH16.1 specifies a tolerance of 1/8 inch in 4 feet
- Arms are horizontal with no visible tilt
- All anchor bolts are fully seated with no movement
- Every torqued connection — base-to-column, arm-to-column, bracing fasteners — has been verified with a calibrated torque wrench
- No dents, kinks, or damaged components anywhere in the system
No-load functional check: Walk the entire installed system. Check for any wobble, rocking, or uneven floor contact. Verify that arms at the same level are consistent in height across adjacent columns.
Capacity plates: Best practice — and a requirement under RMI guidelines — is to permanently affix capacity plates identifying load size, load weight, and rack configuration. Post them prominently before the first pallet or bundle goes on the arms.
These steps matter beyond paperwork. Undertorqued bolts loosen under dynamic loading, and an unlevel column gradually redistributes load unevenly until a section fails under weight. The full validation walkthrough takes 30–60 minutes — time that's well spent before you discover a problem the hard way.
Common Installation Problems and Fixes
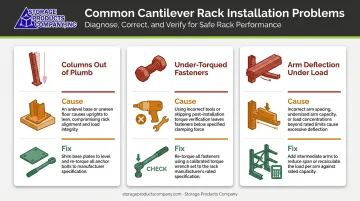
Columns Out of Plumb
Problem: Uprights lean or appear misaligned after erection.
Cause: Base was not leveled before anchoring, or anchor holes were drilled off the marked footprint.
Fix: Loosen base anchor bolts, use a plumb bob or laser level to realign the column, insert steel shims under the base to correct level, then re-torque all anchors to spec before continuing. Do not load a column that is out of plumb.
Under-Torqued or Missing Fasteners
Problem: Connections feel loose or arms flex noticeably under light handling before any real load is applied.
Cause: Wrong tools used (standard wrench instead of a torque wrench or impact wrench), skipped torque verification after hand-tightening, or hardware missing from delivery.
Fix: Use a calibrated torque wrench to verify and re-torque every connection to manufacturer specification. Cross-reference the packing list to identify any missing hardware before the system is loaded.
Arm Deflection Under Load
Problem: Arms visibly sag or bow when product is placed.
Cause: Arms spaced too far apart for the load length or weight, or the wrong arm capacity selected for actual load weight per level.
Fix: According to Steel King's guidance, required arm capacity equals load weight divided by the number of arms supporting the load per level. If deflection is present with 2 arms, add a third.
Keep these positioning rules in mind:
- Non-uniform loading patterns can reduce arm capacity by up to 50%
- Loads must be flush with the back of the arm — never pushed from the front or side-shifted
- Never exceed the arm's rated capacity
Pro Tips for Installing Cantilever Racks Effectively
Complete each starter bay before moving to adder bays. A partially assembled run of columns without bracing can shift and rack before it's stabilized. Always have two people present — single-person upright installation is both unsafe and impractical.
Decide on arm type and accessories before installation day. Straight arms handle lumber, sheet goods, and stable loads. Inclined arms are required for anything cylindrical that can roll. Adding arm lips or pipe stops at install time takes minutes. Retrofitting them later under load is a different job entirely.
Document everything after installation. At minimum, cover these four items:
- Photograph the completed system from multiple angles
- Retain the manufacturer's installation instructions and packing list
- Record all torque settings applied
- Schedule a formal inspection if your facility is subject to OSHA review or carries high-value inventory
Per RMI guidance, rack inspections should occur at least annually.
For large-scale, structurally demanding, or high-bay installations, bring in experienced installers. Storage Products Company, based in Mobile, Alabama, has handled cantilever rack projects across warehouses, distribution centers, and manufacturing facilities throughout the Southeast for over 43 years — providing factory-recommended insured installation and AutoCAD layout design from initial planning through post-installation inspection.
Conclusion
A cantilever rack that is plumb, properly anchored, correctly torqued, and validated before loading will perform reliably for years. One that was rushed through — skipped steps, wrong tools, missed torque specs — becomes a structural liability that surfaces under load, often at the worst possible time.
Invest in the preparation: floor assessment, capacity calculations, and layout planning before any components are assembled. Execute the installation sequence without shortcuts. Validate before loading. Get those three right, and the system earns its place in your facility for the long term. If you need installation support, layout design, or a post-installation rack inspection, Storage Products Company has handled cantilever rack projects across warehouses, distribution centers, and manufacturing facilities throughout the Southeast for over 43 years.
Frequently Asked Questions
Do cantilever racks need to be anchored?
Yes. Anchoring is mandatory. Uprights and bases must be secured to a concrete slab using appropriately sized wedge anchors at the embedment depth specified by your anchor manufacturer and project drawings. Non-concrete surfaces are not approved for cantilever rack installation.
How much weight can a cantilever rack hold?
Capacity depends on column height, arm length, arm rating, and arm count. Divide the total load weight per level by the number of supporting arms to get required arm capacity, then verify against the manufacturer's rated specs. Non-uniform loading can reduce effective arm capacity significantly.
What is a cantilever racking system?
Cantilever racking is built from vertical columns, extended bases, horizontal arms, and down-aisle bracing. With no vertical front obstruction, it's designed for long, bulky, or irregularly shaped materials that can be loaded and retrieved from either side.
What is a cantilever rack used for?
Warehouses, lumber yards, manufacturing facilities, steel service centers, and building material distributors use cantilever racks to store items that don't fit on standard pallet rack, including steel tubing, timber, plywood sheets, PVC pipe, conduit, rolled goods, and furniture.
Can I install cantilever racking myself, or should I hire a professional?
Smaller single-sided systems can be assembled by a capable two-person team with the right tools and manufacturer instructions. Taller systems, high-capacity configurations, or facilities with permitting requirements should be handled by trained, insured installers to ensure safety and code compliance.
How do I know if my floor can support a cantilever rack?
The slab must meet the compressive strength required by your anchor manufacturer (anchor tables often reference 2,500–3,000 psi, but the exact value depends on the anchor and project drawings). The system's total loaded weight must not exceed the slab's rated capacity. Large installations may warrant a ground survey.