Introduction
Shelving installation spans an enormous range. A freestanding wire unit snaps together in under an hour with no tools and no wall penetrations. Commercial-grade steel shelving in a warehouse or distribution center is an entirely different undertaking — a multi-person, multi-day project requiring structural checks, load capacity verification, and precision anchoring.
The gap between those two scenarios is where most installation failures happen. Anchors pulled from hollow drywall, shelves tilted under load, freestanding units that wobble because connectors were never fully seated — these aren't random failures. They're predictable outcomes of skipped steps.
This guide covers the complete installation process for both wall-mounted and freestanding systems — prerequisites, tools, step-by-step assembly, and the most common failure points with direct fixes.
For commercial and industrial shelving in warehouses, distribution centers, and manufacturing facilities, the later sections address when professional installation is the right call and what that process involves.
Key Takeaways
- Shelving installation spans tool-free freestanding units to wall-anchored and industrial systems that require structural verification.
- Always locate studs before anchoring wall-mounted shelves — drywall alone cannot support meaningful loads.
- Assemble freestanding units bottom-up; level and plumb checks are required at every stage.
- Never exceed manufacturer-rated load capacity — limits vary significantly by product and shelf size.
- Commercial-scale shelving in warehouses and distribution centers requires professional installation.
Shelving Installation Overview
The installation process follows four phases regardless of shelving type:
- Site preparation — measure, clear the area, locate anchor points
- Assembly or anchoring — build the frame or mount wall standards
- Integration and adjustment — install shelves, check alignment, connect components
- Validation — level checks, load testing, stabilization
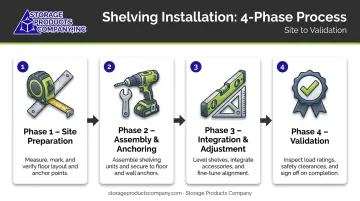
The time investment varies considerably. A single-person freestanding wire unit typically takes under an hour. Wall-mounted bracket-and-standard systems run 2–4 hours. Heavy-duty commercial shelving in a warehouse is a multi-person, multi-day project that benefits from layout planning before a single bracket goes up.
Prerequisites and Safety Considerations
Before touching any hardware, confirm these conditions are in place:
- Floor levelness — measure how much variation exists; plan for leveling feet or shims accordingly
- Wall type — drywall, masonry, or concrete each require different fastener systems
- Stud location — for wall-mounted systems, identify stud centers (typically 16 or 24 inches on-center per the 2021 International Building Code)
- Load capacity match — verify the shelving unit's rated capacity against actual inventory weight before purchasing
Do not proceed if:
- Planned anchor points fall on hollow drywall without backup hardware rated for the load
- The unit's rated capacity is lower than the planned stored weight
- Stud spacing doesn't align with the wall standard mounting holes for heavy loads
For units over 72 inches tall, plan wall-stabilization brackets before you start — not as an afterthought after assembly.
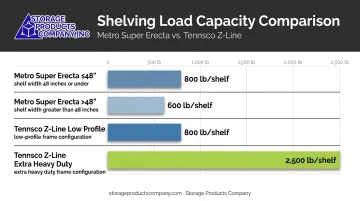
Load capacity context: Manufacturer ratings vary significantly by product. Check the manufacturer's specific capacity chart before purchasing — generic estimates will get you in trouble.
| Product | Shelf Capacity | Notes |
|---|---|---|
| Metro Super Erecta (≤48") | 800 lb/shelf | Evenly distributed load |
| Metro Super Erecta (>48") | 600 lb/shelf | Evenly distributed load |
| Tennsco Z-Line Low Profile | 800 lb/shelf | Boltless configuration |
| Tennsco Z-Line Extra Heavy Duty | 2,500 lb/shelf | Boltless configuration |
Tools and Materials Required
Tools Checklist
- Stud finder (electronic)
- Drill with standard and masonry bits
- 4-foot level
- Tape measure
- Rubber mallet (for wire shelf clips)
- Screwdriver (flathead and Phillips)
- Pencil or chalk line for marking layout
Materials by Shelving Type
Wall-Mounted Systems
- Shelf standards/tracks and brackets
- Fasteners per manufacturer specification — screw length and diameter vary by standard series, so use the manufacturer's specified hardware rather than a universal size
- Toggle bolts or hollow-wall anchors for stud-free locations
- Masonry anchors for concrete or brick walls
Freestanding Wire Systems
- Posts, shelves, split-sleeve connectors or clips
- Leveling feet or casters
Optional but Useful
- Candle wax to ease screw insertion
- Hacksaw or bolt cutters for trimming wire shelves to size
- Shims for uneven floors or walls
How to Install Shelving (Step-by-Step)
Skipping steps, particularly leveling and stud-finding, creates problems that are much harder to correct once shelves are loaded.
Step 1 — Plan and Measure
Measure wall height, width, and depth before unpacking anything. Determine shelf height intervals based on what you're storing. Mark stud locations clearly on the wall. Confirm the shelving unit's dimensions fit the space, including clearance for doors, columns, and aisle requirements.
Step 2 — Prepare the Installation Site
Clear the area completely. Repair any wall damage that could compromise anchor strength. Mark stud positions or note anchor locations for non-stud installations. Check the floor with a level — identify whether adjustment will come from leveling feet, shims, or both.
Step 3 — Anchor Standards or Assemble the Frame
For wall-mounted systems:
- Hang the first standard with a single screw
- Confirm it's plumb using a level
- Drive remaining screws once alignment is confirmed
- Repeat for each additional standard, using a level across brackets to verify horizontal alignment before fastening
For freestanding units:
- Insert leveling feet into posts first
- Assemble per manufacturer sequence — bottom shelf first, working upward
- This sequence stabilizes the structure as you build
Step 4 — Install Shelves and Connect Components
Wall-mounted: Hook brackets into standards at matching slot heights on each track. Lay shelves onto brackets and secure per manufacturer instructions.
Wire systems: Snap shelves onto clips or connectors using a rubber mallet. Confirm each clip is fully seated before moving to the next level — an unseated clip looks secure but fails under load.
Step 5 — Secure and Stabilize
Before calling the installation complete:
- Freestanding units: Attach the top to the wall with a stabilizing bracket, even when the floor is level
- Wall-mounted systems: Verify all standards are horizontally aligned before final fastening
OSHA 29 CFR 1910.176 requires tiered storage to be stable and secure against sliding or collapse. Bracing at this stage is not optional.
Common Installation Problems and Fixes
Most installation failures trace back to a small set of predictable errors.
Shelves Are Uneven or Sloping
Cause: Standards hung at different heights, brackets inserted at mismatched slots, or wall isn't plumb.
Fix: Use a 4-foot level across brackets before securing shelves. If the wall is uneven, place shims behind the lower standard to compensate rather than adjusting bracket slot positions. Bracket adjustments introduce tilt; shims restore the plane.
Anchors Pulling From the Wall
Cause: Screws driven into drywall without hitting a stud, or wrong anchor type for the wall material.
Fix: Remove the standard and reposition to hit a stud. If stud location isn't workable, replace standard drywall anchors with appropriately rated alternatives.
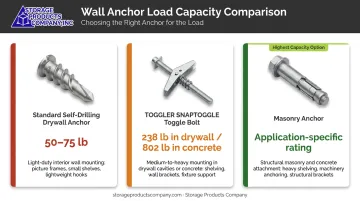
Anchor load ratings vary significantly by type:
- Standard self-drilling drywall anchors: rated 50–75 lb
- TOGGLER SNAPTOGGLE heavy-duty toggle bolts: up to 238 lb in ½-inch drywall, 802 lb in concrete
- Masonry anchors: selection requires matching diameter, embedment depth, and concrete strength — no single anchor fits all applications
Knape and Vogt's 82/182 system, tested through drywall into wood studs at 16-inch spacing, is rated at up to 450 lb per bracket pair with evenly distributed loading. That rating disappears entirely if screws miss the stud.
Freestanding Unit Wobbles or Tilts
Cause: Uneven floor contact, or clips not fully seated.
Fix: Adjust leveling feet individually until all four contact the floor evenly. Tap each clip with a rubber mallet to confirm full seating. For tall units, add a wall stabilization bracket at the top in all cases. An OSHA accident report (Summary 200151520) documents a fatal shelving collapse during assembly when the unit was not fully braced. This step is a structural requirement, not a precaution.
Pro Tips for Installing Shelving Effectively
Work bottom-up on freestanding units. Starting with the lowest shelf and building upward stabilizes the structure during assembly and eliminates the tipping risk that comes with top-heavy partially assembled units.
Distribute weight deliberately. Per the Texas Department of Insurance warehouse safety guidance, place heavier items on lower or middle shelves and lighter items on top. This lowers the unit's center of gravity and reduces tip-over risk. Manufacturer capacity ratings — including every Metro, Tennsco, and Knape and Vogt rating cited in this guide — assume evenly distributed loading. Point loads and uneven stacking reduce effective capacity.
Photograph stud and anchor locations before covering them. Once shelving is installed and loaded, finding anchor points for future adjustments, inspections, or moves requires guesswork that can cause unnecessary wall damage. A quick photo before loading saves that guesswork later.
For commercial-scale installations, the complexity compounds quickly. Layout planning, structural assessment, load verification, and coordination across a warehouse floor are a different category of work from mounting a bracket system in a backroom.
Storage Products Company, headquartered in Mobile, Alabama and operating across the Southeast for over 43 years, provides AutoCAD-based layout drawings before installation begins, so aisle widths, column clearances, and storage density are optimized before anything is bolted down. Their installation crews are factory-recommended and insured, covering wire shelving, industrial steel shelving, boltless/rivet systems, and high-rise configurations across warehouse, distribution center, and manufacturing environments.
Conclusion
A properly installed shelving system — leveled, anchored correctly, and loaded within rated capacity — runs for years without issue. The failures that end up in OSHA incident reports or costly facility shutdowns almost always start with a skipped step: a stud missed, a clip not seated, a unit left unbraced.
Match your approach to the scope. DIY is realistic for light freestanding units and straightforward wall-mounted systems in residential or light commercial settings. For industrial shelving in warehouses, distribution centers, or high-density storage environments, professional installation is the right baseline — not an optional upgrade. Skipping it puts both inventory and the people working around it at risk. A dealer with installation, rack inspection, and layout design capabilities, like Storage Products Company, can make sure the system is configured correctly from the start and stays compliant over time.
Frequently Asked Questions
How much does shelving installation cost?
DIY costs are limited to the shelving unit and hardware. Professional installation for commercial or heavy-duty shelving varies significantly based on system type, facility size, wall substrate, and configuration complexity. No reliable universal price range exists for commercial projects — request a direct quote for accurate estimates.
Can you install shelves without drilling?
Freestanding wire shelving systems require no drilling and connect via clip-on or split-sleeve connectors. Wall-mounted shelves require drilling into studs or appropriate anchors. Freestanding is the best no-drill option for flexibility.
What is the triangle rule for shelves?
The triangle rule refers to distributing bracket support so the shelf, wall, and bracket form a rigid triangle. Brackets should be placed no more than one-third of the shelf depth from the wall to prevent tipping and maximize load stability.
How do I find studs for shelf installation?
Use an electronic stud finder and scan horizontally. Studs are typically spaced 16 or 24 inches apart. In plaster walls, probe near the baseboard with a finish nail to locate studs before marking higher positions on the wall.
What type of shelving is best for a warehouse or commercial space?
Wire shelving suits lighter loads requiring airflow or visibility; boltless steel handles medium-to-heavy hand-loaded storage with tool-free adjustability; industrial and heavy-duty steel systems handle the highest per-shelf loads. Match the system to your specific weight, access, and density requirements.
How much weight can wall-mounted shelves hold?
Capacity depends on bracket type, stud engagement, and substrate. Knape and Vogt brackets range from 200 lb per pair (regular duty) to over 1,000 lb per pair (super duty) under specific mounting conditions. Always use the manufacturer's rated capacity for your specific bracket and mounting configuration.