This guide covers 12 practical tips for warehouse layout design and efficiency—from initial space planning and racking selection to workflow zoning, safety compliance, and long-term scalability. Whether you're building out a new facility or rethinking an existing one, these tips apply across distribution centers, manufacturing warehouses, and 3PL operations of all sizes.
TL;DR
- Layout type matters: Match your U-shaped, I-shaped, or L-shaped layout to your building and product flow.
- Vertical space is free storage: Most warehouses underutilize ceiling height; the right racking system can recover it without adding square footage.
- Slot fast movers close to shipping: Positioning high-velocity SKUs near packing zones directly cuts picker travel time and labor costs.
- Zones prevent chaos: Clearly marked receiving, storage, picking, packing, and shipping zones cut bottlenecks and picking errors.
- Test before you install: Simulate the layout on the floor before committing to permanent equipment placement.
What Is Warehouse Layout Design and Why Does It Matter?
Warehouse layout design is the strategic arrangement of every internal zone: receiving, storage, picking, packing, shipping, and employee areas. The goal is to move goods, workers, and equipment through the most efficient sequence possible.
A well-designed layout delivers measurable business results:
- Shorter travel distances = lower labor cost per order
- Logical zone separation = fewer mis-picks and order errors
- Clear aisle definitions = fewer forklift incidents and OSHA violations
- Better space utilization = lower cost per pallet stored
A poorly designed facility creates the opposite effect. Receiving dock congestion backs up inbound freight, pickers share paths with forklifts, and inventory lands wherever space is available rather than where it makes operational sense.
The Three Standard Layout Patterns
Most warehouse layouts follow one of three flow patterns:
| Layout | Flow Description | Best For |
|---|---|---|
| U-Shaped | Receiving and shipping share the same side; storage fills the back | Most facility sizes; shared dock resources |
| I-Shaped | Straight line from receiving to shipping | High-throughput operations; dedicated dock doors |
| L-Shaped | Docks on adjacent walls | Cross-docking; separating inbound and outbound traffic |
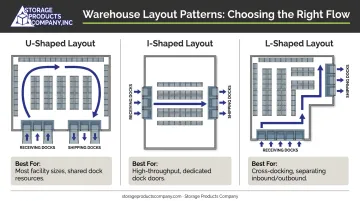
This decision shapes every downstream choice. Choose your layout pattern before specifying any equipment.
Tips 1–4: Plan Your Space Before You Design
Tip 1 — Start With an Accurate Floor Plan
Before touching a rack layout, measure everything. Missing a column grid or fire riser during planning creates expensive conflicts at installation time. Critical measurements to capture upfront:
- Floor dimensions and usable square footage
- Ceiling clear height (especially under beams and sprinkler drops)
- Column grid locations and spacing
- Dock door positions and centerline heights
- Fixed infrastructure: restrooms, electrical panels, utility rooms, fire risers
Storage Products Company uses AutoCAD technology to produce scaled layout drawings that show rack elevations, plan views, aisle layouts, and equipment placement—giving facility planners a clear picture of how every system fits before a single piece of equipment is ordered.
Tip 2 — Map the Workflow Before Placing a Rack
The physical layout should mirror how goods actually move through your facility. Walk through these questions before specifying storage:
- How are inbound shipments received and inspected?
- Where do goods stage before put-away?
- How do pickers travel to retrieve inventory?
- Where does packing occur relative to pick zones?
- How do outbound orders move to the shipping dock?
If your layout forces workers to cross zones, backtrack, or compete with forklift traffic, the design is working against the operation.
Tip 3 — Choose Your Layout Type Based on Building Shape and Throughput
- U-shaped works for most facility sizes and is ideal when dock resources are shared between receiving and shipping
- I-shaped suits high-throughput operations where goods move in a consistent, predictable straight line
- L-shaped fits facilities where separating inbound and outbound traffic prevents dock congestion
The choice directly determines aisle orientation, zone placement, and how every piece of equipment gets positioned.
Tip 4 — Design Aisle Widths Around Your Equipment
Aisle width is not a standard number. It depends entirely on the material handling equipment in use. According to Raymond's Storage Space Efficiency Guide, aisle requirements in a 21-foot clear-height building vary significantly by truck type:
- Counterbalanced forklift: ~144 inches (12 feet)
- Reach truck: ~105 inches
- Very narrow aisle (swing-reach) truck: ~66 inches, with up to 46% more pallets stored
Undersized aisles create collision risk and OSHA violations. 29 CFR 1910.176(a) requires sufficient safe clearances for all mechanical handling equipment. Oversized aisles waste valuable floor space. Storage Products Company factors lift truck fleet specifications directly into AutoCAD aisle layouts to hit the right balance.
Tip 5 — Test the Layout Before Committing to Permanent Installation
Use masking tape on an open floor to mark aisle boundaries, zone perimeters, and equipment footprints. Then walk through the space with boxes, move pallets, and run forklifts through the turns. This simulation identifies tight corners, inefficient paths, and zone conflicts before heavy racking gets bolted to the floor.
Relocating installed pallet racking costs far more than moving tape—in labor, downtime, and potential structural damage.
These five planning steps set the foundation. The tips that follow focus on how to maximize the storage capacity and operational efficiency within the space you've just defined.
Tips 5–8: Maximize Storage With the Right Racking and Shelving
Tips 6–9: Maximize Storage With the Right Racking and Shelving
Tip 6 — Use Your Full Vertical Clearance
Most facilities leave significant overhead space unused—and every unused cubic foot above your current rack height represents storage capacity you're already paying rent on.
Selecting the right racking system starts with two questions: How frequently do you need access to each SKU? And how dense does storage need to be?
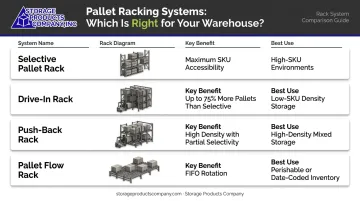
- Selective pallet rack (single-deep): Maximum SKU accessibility; ideal for high-SKU environments where every pallet needs to be independently reachable. Storage Products Company carries Frazier and UNARCO selective rack systems, both designed to RMI/ANSI MH16.1 specifications.
- Drive-in/push-back rack: Higher density at the cost of selectivity; drive-in rack can store up to 75% more pallets than selective rack in the same footprint.
- Pallet flow rack: True FIFO rotation with high-density storage; product loads from one aisle and unloads from another—useful for date-coded or perishable inventory.
Narrow-aisle concepts can increase existing storage space by up to 80% by trading aisle width for additional rack rows.
Tip 7 — Slot Fast-Moving Inventory Near Packing and Shipping
Warehouse slotting means positioning your highest-velocity SKUs in the most accessible locations closest to packing and outbound staging. If your top 20% of SKUs drive 80% of picks, those products should be the easiest to reach.
Slow-moving inventory, by contrast, can occupy less accessible positions without hurting throughput:
- Upper beam levels and back rows of selective rack
- High-density bulk storage (drive-in or push-back)
- Off-pick-path overflow areas
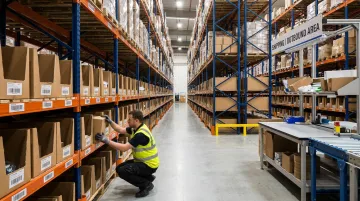
Slotting analysis tools can evaluate tens of thousands of SKUs and model alternate storage configurations simultaneously—making optimization practical even for large, complex operations.
Tip 8 — Add Square Footage Vertically With Mezzanines and VRCs
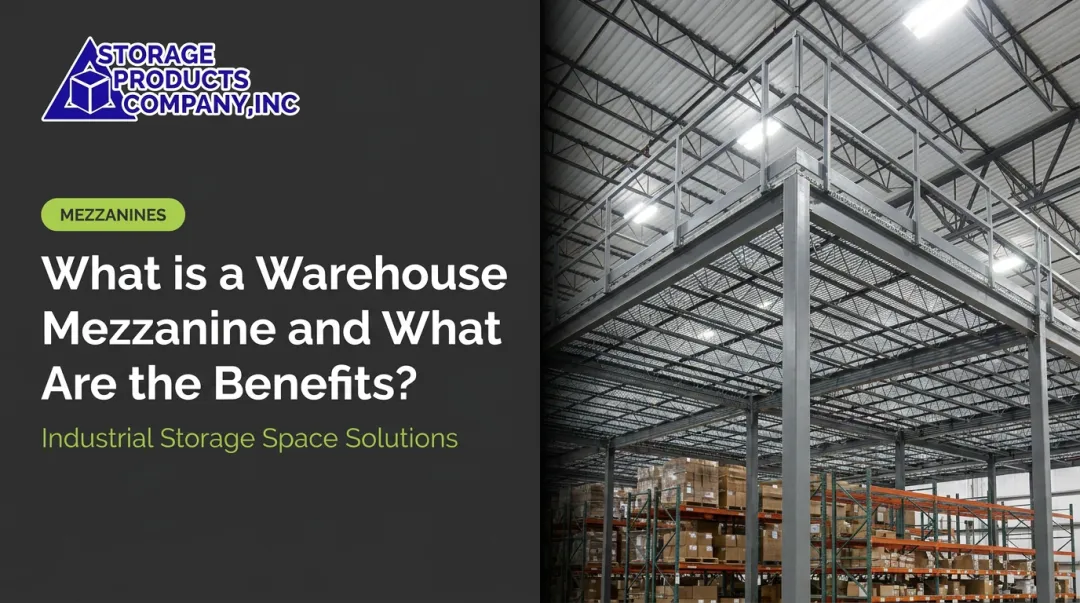
When floor space is constrained, mezzanines create an additional level for storage, packing stations, or office space above the main floor—without expanding the building footprint. According to PFlow Industries, mezzanines can nearly double usable floor space inside an existing facility.
Storage Products Company installs free-standing and structural mezzanines through Cubic Designs, with PE-stamped drawings, Lifetime Structural Warranty, and compliance with International Building Code requirements.
Vertical Reciprocating Conveyors (VRCs) from Pflow Industries move goods safely between floor levels without requiring elevator codes—making them the practical choice for mezzanine-to-floor material transfer where stairs aren't appropriate for bulk material movement.
Tip 9 — Match Shelving Type to What's Being Stored
Not everything belongs on a pallet rack. Using the wrong shelving type leads to damaged goods, wasted space, and poor pick accessibility.
| Product Type | Shelving Solution | Supplier |
|---|---|---|
| Small parts, fasteners, hardware | Rivet/boltless shelving | Penco |
| Boxed goods, MRO, automotive parts | Steel shelving (up to 30+ feet high-rise) | Penco |
| High-visibility parts storage | Wire shelving | Nashville Wire Products |
| Odd-shaped cartons, totes, bins | Carton flow rack | Frazier |
Tips 9–12: Workflow, Safety, and Ongoing Optimization
The final set of tips covers the operational and compliance decisions that determine whether a warehouse runs smoothly long-term — and whether it stays safe and scalable as the business grows.
Tip 10 — Define and Label Every Functional Zone
A warehouse without clear zone boundaries becomes a warehouse where inventory lands wherever workers put it. Every facility needs distinctly marked areas for:
- Receiving and inbound staging
- Put-away and bulk storage
- Active picking
- Packing and value-added services
- Outbound staging and shipping
- Employee service areas (break rooms, lockers, restrooms)
Color-coded floor markings and consistent overhead signage reduce confusion, prevent workers from inadvertently blocking traffic, and speed up onboarding for new hires who can read a zone before they've learned the floor plan.
Tip 11 — Build OSHA Compliance Into the Layout From Day One
Safety requirements aren't a checkbox after the layout is done—they directly shape how the layout must be designed. Key requirements with direct layout implications:
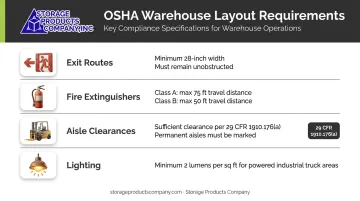
- Exit routes: At least two exit routes required in most workplaces; minimum 28-inch width at all points per OSHA 29 CFR 1910.36; must remain unobstructed and clearly marked
- Fire extinguishers: Class A maximum travel distance of 75 feet; Class B maximum 50 feet—placement must be mapped into the layout
- Aisle clearances: OSHA 29 CFR 1910.176(a) requires sufficient safe clearances for mechanical handling equipment; permanent aisles must be marked
- Lighting: Adequate illumination in all storage and travel areas; powered industrial trucks require auxiliary lighting where general illumination falls below 2 lumens per square foot
The warehousing and storage sector recorded a 4.8 injury rate per 100 full-time workers in 2024 (BLS), and workplace injuries cost an average of $48,000 per medically consulted incident according to the National Safety Council. Mapping these requirements into the layout at the design stage eliminates the far more disruptive and expensive process of reconfiguring a live operation to meet code.
Rack protection components — column protectors, end-of-aisle guards, guard rails, bollards, and wire decking — need to be specified alongside the rack system itself, not sourced as an afterthought once the layout is installed.
Tip 12 — Design for Scalability and Review the Layout Regularly
A layout that works perfectly today becomes a bottleneck within two or three years if business volume grows, SKU profiles shift, or automation gets introduced. Build in flexibility from the start:
- Leave buffer zones in the initial layout rather than filling every square foot
- Specify modular, adjustable racking rather than fixed structures
- Use selective rack shelf positions on 2-inch vertical centers so beam heights can change as pallet profiles evolve
- Schedule periodic layout audits—reviewing pick rates, travel time, and space utilization metrics—before problems become productivity crises
Common Warehouse Layout Mistakes to Avoid
Three mistakes account for the majority of costly warehouse redesigns:
- Ignoring vertical space. The overhead cube above your current rack height is storage you're already paying to heat, cool, and insure. Narrow-aisle configurations and mezzanines recover that space without expanding your building footprint.
- Designing for today's inventory only. Warehouses undergo expensive redesigns when the original layout leaves no room for volume growth, new product categories, or automation. Building in buffer capacity upfront costs far less than removing installed equipment two years later.
- Skipping simulation and training. Pre-installation modeling catches problems before heavy equipment gets anchored. Even a well-designed layout fails if workers don't understand the zone logic — a DC Velocity survey found mis-picks cost individual distribution centers an average of $389,000 per year.
Avoiding these mistakes is easier when you have AutoCAD layout drawings and equipment expertise in your corner. Storage Products Company offers layout assessments, multi-manufacturer equipment selection, and factory-recommended insured installation across Alabama and the Southeast.
Frequently Asked Questions
What is the cost of warehouse design?
Warehouse layout design costs vary widely based on facility size, complexity, and project scope. Turnkey projects (covering layout planning, equipment, and installation) scale with the storage systems and automation involved. Many equipment dealers include AutoCAD layout drawings as part of the equipment sales process at no separate charge.
What is an example of a warehouse layout pattern?
The U-shaped layout is the most common example. Receiving and shipping are positioned on the same side of the building, with storage filling the back of the "U." It works well for most facility sizes and allows dock resources—people, equipment, and staging space—to be shared between inbound and outbound functions.
What is the U-shaped warehouse layout?
The U-shaped layout places receiving and shipping on the same side of the facility, with storage and picking zones forming the back of the U. It suits facilities with moderate throughput — though high-volume operations separating inbound and outbound traffic may benefit from an I-shaped or L-shaped flow instead.
What software is used to design warehouse layouts?
AutoCAD is the standard tool among material handling specialists, used to produce rack elevations, plan views, and aisle configurations. Warehouse-specific design platforms and general floor plan software are also available for in-house teams. Storage Products Company provides AutoCAD layout drawings as part of the equipment procurement process.
What are the 7S rules in warehouse?
The 7S warehouse methodology (Sort, Set in Order, Shine, Standardize, Sustain, Safety, and Spirit) provides a framework for organized, safe, and efficient warehouse operations. These principles reinforce good layout design by ensuring discipline holds after the initial setup.
What are the 7 types of warehouses?
The main warehouse types are private, public, bonded, climate-controlled, distribution center, fulfillment center, and smart/automated. Layout design approaches vary for each based on throughput requirements, regulatory constraints (bonded warehouses have customs requirements), temperature controls, and the degree of automation involved.