
](https://file-host.link/website/storageproductscompany-f1cvqe/assets/blog-images/8ae056d8-0168-43b8-92e8-07c9977a8b64/1779641340327578_f34c1c5d010345439b756d3b623b9d0e/360.webp)
CAD drafters, facility planners, and engineers responsible for producing consistent, print-ready drawing sets are the ones who feel this most acutely. Mismatched scales, inconsistent borders, and annotation sizing errors are almost always traced back to layouts that were never properly configured in the first place.
For companies like Storage Products Company — which produces AutoCAD layout drawings to help warehouse and distribution center clients visualize pallet racking, mezzanines, conveyors, and dock equipment before any installation begins — getting layout templates right isn't a technical nicety. It's the difference between a client-ready drawing and one that requires rework before it can be presented.
Key Takeaways
- Layouts (paper space) are virtual print sheets, separate from model space where geometry lives
- Key setup sequence: create layout → configure page setup → insert title block → create viewports → set and lock scales → save as .dwt
- Finalize units, plot styles, and layer standards before configuring layouts — changes later require redoing viewport and annotation work
- Unlocked viewports are the single most common cause of scale errors at print time
- Save via File → Save As → Drawing Template (.dwt) to a shared folder so every team member starts from the same baseline
What Are Layouts in AutoCAD?
Autodesk defines a layout as a 2D working environment for creating drawing sheets. The area inside it is called paper space — where you control how your drawing appears on a printed sheet, including scale, borders, title blocks, and annotations.
Model Space vs. Paper Space
The distinction matters because the two environments do different jobs. Model space is where all geometry is drawn at 1:1 scale using real-world dimensions. Paper space (layouts) is where you compose the sheet, set print scales, and add title blocks — without touching the underlying model.
This separation is what allows a single model to be presented across multiple sheets at different scales. A warehouse floor plan might appear at 1:100 on one layout tab and 1:20 on a detail sheet — both pulling from the same model geometry, each configured for its own output sheet.
Common Use Cases
- Architectural drawings showing floor plans and elevations on standard ANSI or ISO sheets
- Engineering drawings presenting multiple equipment views on a single sheet
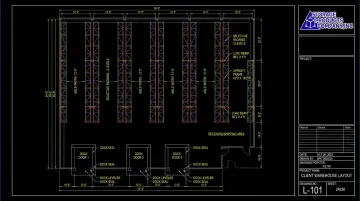
- Warehouse and facility layouts showing storage rack configurations, aisle spacing, pallet footprints, and dock equipment placement
Storage Products Company uses AutoCAD layouts in exactly this way — producing warehouse layout drawings that help clients see a full system configuration before committing to an order.
What to Prepare Before Setting Up Layouts
Decisions made before you touch the Layout tab determine whether your viewports, annotations, and plot output hold together — or require a full redo. Lock these in first:
Drawing foundation:
- A drawing file with model space content, or a blank file for template creation
- Units confirmed as imperial or metric — use acad.dwt for imperial/ANSI work, acadiso.dwt for metric/ISO
- Your title block file or block ready to insert
Plot and print standards:
- Plot style table selected — CTB (color-dependent) assigns lineweight by layer color; STB (named) assigns it by style name. Autodesk's plot style documentation covers the difference in detail
- Target paper size confirmed against your actual plotter or PDF driver (DWG To PDF.pc3). The available ANSI and ISO sizes in the Page Setup dialog depend on the selected plotting device — not a universal AutoCAD list
- Layer naming conventions finalized
Don't begin layout configuration until units, plot styles, and layers are set. Changing any of these after viewport and annotation work is done means redoing that work from scratch — there's no clean retroactive fix.
How to Set Up Layouts in AutoCAD Template Drawings, Step-by-Step
The sequence below follows the order AutoCAD expects. Skipping ahead — particularly past page setup or viewport scale locking — creates errors that only surface at plot time.
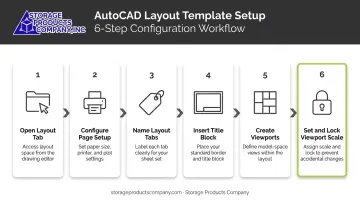
Step 1: Open AutoCAD and Access the Layout Tab
Start a new drawing from acad.dwt (imperial) or acadiso.dwt (metric). At the bottom of the screen, click the Layout1 tab to enter paper space. AutoCAD provides Layout1 and Layout2 by default — you'll rename and reconfigure these in the next steps.
Step 2: Configure Page Setup
Right-click the Layout tab and select Page Setup Manager. This opens the PAGESETUP dialog, where you define:
- Paper size — select from your plotter or PC3 driver's available list
- Plot device — your physical printer or DWG To PDF.pc3
- Plot style table — attach your CTB or STB file here
- Plot scale — typically 1:1 for layouts, since scale is controlled at the viewport level
Set these before placing any content. If you skip this step, paper size mismatches and plot style errors will surface at print time with no clean fix.
Step 3: Name and Organize Layout Tabs
Right-click the layout tab and select Rename. Use descriptive names that communicate the sheet content — for example:
Floor Plan – Sheet 1Rack ElevationMezzanine PlanDock Equipment
For multi-sheet templates, add additional tabs via right-click → New Layout. Clear naming is especially important in team environments where multiple people work from the same template set.
Step 4: Insert the Title Block and Border
Use Insert → Block to place a title block, or attach it as an external reference via the XREF command. Place it in paper space at the 0,0 origin so it aligns with the page boundary.
A complete title block should include editable fields for:
- Project name and client name
- Drawing number and sheet number
- Scale, author, and date
- Revision history
Leave placeholder text in any field you can't populate at the template stage — it signals to the next user that the field needs updating.
Step 5: Create and Position Viewports
Viewports are windows from paper space into model space. Create them using the MVIEW command (or View → Viewports → New), drawing the viewport boundary inside the title block border.
Once placed, double-click inside the viewport to enter it, then pan and zoom to show the desired model view. Scale gets set in the next step, after the view is positioned.
Step 6: Set and Lock Viewport Scales
This step prevents the most common layout failure. With the viewport selected (single-click the border, not double-click):
- Use the Viewport Scale dropdown on the status bar to set the exact scale (such as 1:50 or 1:100)
- Immediately click the lock icon next to the scale control to enable Display Locked
Autodesk documents this locking behavior as the control that prevents accidental zoom changes from shifting the viewport scale. An unlocked viewport looks correct until someone scrolls inside it, shifting the scale and breaking plot accuracy.
Configuring Viewports, Scales, and Title Blocks
Managing Multiple Viewports
A single layout can hold multiple viewports at different scales — useful for combining an overview with a detail callout on the same sheet. A warehouse floor plan layout, for example, might use 1:100 for the full facility view and 1:20 for a specific rack bay detail.
Key practices for multi-viewport layouts:
- Place viewport borders on a dedicated layer (name it something like
VPORTSorNO-PLOT) and turn off the Plot setting for that layer so borders don't print - Use named views in model space to make viewport navigation repeatable across drawings
- Lock every viewport immediately after setting its scale
Annotation in Paper Space vs. Model Space
Text and dimensions placed in paper space render at a consistent printed size regardless of which viewport they're near. Sheet-specific annotations — general notes, title block labels, sheet-level dimensions — belong in paper space, not inside viewports.
For template layouts, follow these annotation placement rules:
- Keep all sheet annotations in paper space for consistent printed output
- Use AutoCAD's annotative scaling for any model space text that must appear in multiple viewports at different scales
- Reserve model space annotations for geometry-linked notes that need to travel with the model
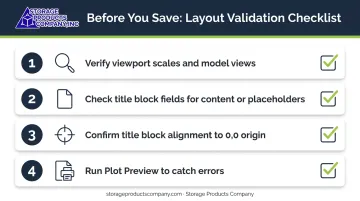
Validating Before You Save
Before saving the template, run through this verification sequence:
- Zoom to each viewport and confirm the correct model view is visible at the correct scale
- Check that all title block fields have content or clear placeholder text
- Confirm the title block aligns to the 0,0 paper space origin
- Open the Plot dialog and click Preview to catch misalignments, clipped content, or scaling errors before they're locked into the template
Saving Custom Layouts as Reusable Template Files
Once page setup, title block, viewports, layers, and plot styles are all verified, save the file as a template:
Application button → Save As → AutoCAD Drawing Template (.dwt)
Name it descriptively — something like Warehouse-Layout-ANSI-D.dwt — and save it to a shared office standards folder. Then, in Options → Files → Template Settings, set the template file location so all team members are pulling from the same source.
What a saved .dwt carries forward:
- All layout tab configurations and page setup settings
- Plot style table associations
- Layer definitions and standards
- Title block blocks or XREF paths
- Viewport configurations (scales will need verification when model content is added)
A well-built .dwt template means every new facility drawing starts with the correct sheet format. The drafter adds model content and updates the title block fields — the structure is already right.
For a company like Storage Products Company, which produces AutoCAD layout drawings for rack configurations, mezzanine plans, and dock equipment across client facilities, that consistency means clients can review and approve storage system designs with confidence before any equipment is ordered.
Common Layout Setup Problems and How to Fix Them
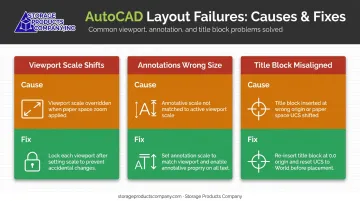
These three issues account for the majority of layout failures in AutoCAD template drawings — and each has a straightforward fix once you know the cause.
Viewport Scale Shifts After Saving
Problem: The layout looks correct on screen but prints at the wrong scale, or the viewport shows a different area after reopening.
Cause: Viewport scale was never locked.
Fix: Single-click the viewport border to select it (don't double-click into it). Open the Properties palette, verify the scale value, and set Display Locked to Yes. Lock every viewport immediately after setting its scale.
Annotations Appear Too Large or Too Small
Problem: Text and dimensions from model space appear at inconsistent sizes when viewed through different viewports.
Cause: Annotations were placed in model space without annotative scaling enabled, or annotation scale was not matched to viewport scale.
Fix: Move sheet-level annotations to paper space where size is layout-controlled. For model space annotations that must appear in multiple viewports, enable the Annotative property and verify the annotation scale matches each target viewport scale.
Title Block Misaligned with Paper Boundary
Problem: When plotting, the title block is clipped or offset from the page edge.
Cause: The title block was inserted at incorrect coordinates, or the Plot Area in Page Setup Manager is not set to Layout.
Fix: Open Page Setup Manager and confirm the Plot Area reads Layout (not Extents or Window). Then use the Move command to align the title block to the 0,0 paper space origin. If the block still doesn't fit, check the paper size setting against your plotter's printable area bounds.
Frequently Asked Questions
What are layouts in AutoCAD?
A layout in AutoCAD is a virtual sheet in paper space where you organize and prepare your drawing for printing or plotting. It's separate from model space, where the geometry is created — layouts control how that geometry appears on a printed sheet, including scale, viewports, title blocks, and annotations.
What is the difference between Model and Layout in AutoCAD?
Model space is the full-scale design environment where geometry is created at 1:1 scale. Layout (paper space) is where you control how that geometry appears on a printed sheet — setting viewport scales, adding title blocks, and configuring plot output — without altering the underlying model.
Can AI help me with AutoCAD?
Yes, though as a productivity aid rather than a substitute for manual configuration. AutoCAD 2025 and 2026 include AI features such as Markup Import/Assist, Smart Blocks, Macro Advisor, and Autodesk Assistant. Core layout tasks — page setup, viewport scales, plot styles, title block alignment — still require direct user input for accurate output.
How do I save a layout as a template in AutoCAD?
Once your layout is configured with page setup, title block, and locked viewports, go to Application button → Save As → AutoCAD Drawing Template (.dwt) and save it to a shared folder. Then set the template file path in Options → Files → Template Settings so all team members pull from the same file.
How do I add a viewport to an AutoCAD layout?
Switch to the Layout tab, type MV (the MVIEW command) or go to View → Viewports → New, then draw the viewport boundary inside the paper space border. Double-click inside the viewport to navigate to the desired model view, set the scale using the status bar dropdown, then lock it immediately.
Why should I use layouts instead of plotting from model space?
Layouts give precise, repeatable control over paper size, scale, and print output, and support multiple views at different scales on a single sheet. Plotting from model space bypasses all of that — output is less predictable and harder to standardize across a professional drawing set.