The consequences of cutting corners are well-documented. OSHA enforcement records include citations for unanchored racks with bent members — conditions that expose workers to struck-by and crush-by hazards. Poor installation also voids manufacturer warranties and creates costly rework.
This guide walks through the complete installation process, from site prep through final validation, with the goal of helping warehouse managers, facility planners, and installation teams get it right the first time.
Key Takeaways
- Always use two trained personnel and read manufacturer instructions before assembly begins.
- Complete site prep, floor assessment, and load planning before touching any components.
- Follow this sequence: floor layout → uprights → beams and shelf levels → bracing → floor anchors.
- Validate plumb, level, anchor torque, and load signage before placing any product on the shelves.
- High-load, multi-bay, or seismic applications call for factory-recommended insured installers to protect warranty coverage and worker safety.
Before You Begin: Prerequisites, Tools & Site Preparation
Skipping pre-installation steps is the leading cause of alignment problems, structural failures, and compliance issues. Time spent here directly reduces rework during assembly.
Prerequisites and Safety Considerations
Start with the floor. The concrete slab must support the intended column loads. UNARCO's installation instructions specify a 6-inch slab with f'c = 3,000 psi as a baseline for normal-duty pallet rack, but have your building engineer confirm the slab can handle your system's actual fully loaded column loads. For shelving, the floor tolerances are less demanding than heavy pallet rack — but verify before anchoring, not after.
Check every upright, beam, decking panel, clip, and connector against the manufacturer's packing list before installation day. Mixed components from different system generations or manufacturers consistently cause seats that won't lock and clips that feel loose — a problem that's far easier to catch at receiving than mid-assembly.
Key pre-installation checks:
- Confirm all components are from the same system and compatible with each other
- Inspect every part for shipping damage — do not proceed with damaged or missing items
- Clear the installation area of obstructions: electrical panels, piping, ductwork — mark them with tape
- Verify PPE for all personnel: gloves, safety glasses, hard hats
- Restrict area access to installation personnel only
For complex layouts or multi-bay runs, AutoCAD layout planning confirms aisle widths, bay positioning, and space utilization before a single component is touched. Storage Products Company provides this as part of project planning — particularly useful when active operational zones and new storage areas need to share floor space without triggering a redesign mid-project.
Tools and Materials Required
| Tool | Required? |
|---|---|
| Rubber mallet | Essential |
| Spirit level | Essential |
| Chalk line | Essential |
| Tape measure | Essential |
| 7/16" socket wrench or nut driver | Essential |
| Hammer drill with concrete bit | Required for anchoring |
| Torque wrench | Required for anchoring |
| Shims | Situational (uneven floors) |
Have anchor bolts, nuts, shelf clips, and safety locking pins on hand before work begins. Do not substitute fasteners not specified by the manufacturer. The anchor bolt diameter and embedment depth are load-bearing values — not suggestions.
How to Install Industrial Shelving: Step-by-Step
Skipping bracing, deferring anchoring, or assembling out of sequence are the most common causes of structural failure and compliance issues. Follow the steps below in order.
Preparing the Installation Site
Use a chalk line to mark the front face of each upright column from a confirmed starting point — typically a wall or column grid line. Establish your aisle widths before marking. OSHA 29 CFR 1910.176(a) requires sufficient safe clearances where mechanical handling equipment is used; a 1972 OSHA interpretation recommends aisles at least 3 feet wider than the largest equipment used, with a minimum of 4 feet. Permanent aisles must also be marked.
Double-check all dimensions against the planned layout before assembly begins. Errors caught at the chalk-line stage cost nothing to fix. Errors caught after two bays are assembled cost hours.
Assembling Uprights and Frames
- Lay two uprights flat on a clean, level surface.
- Attach footplates to each upright base.
- Connect side braces (sway braces for clip-type systems) at the correct hole positions per the manufacturer's chart.
- Finger-tighten only at this stage — do not fully torque bolts until the unit is plumb and leveled in its final position.
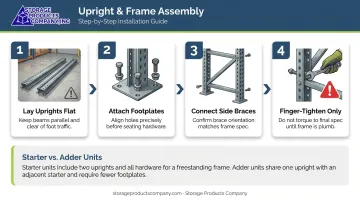
Identify whether each upright is a starter or adder configuration before assembly begins. Starter units include two full uprights. Adder units share an upright with the adjacent bay. Using the wrong configuration creates gaps, misaligned holes, and connection points that simply won't work.
Installing Beams and Shelf Levels
Install levels in this specific order:
- Bottom shelf level first — this ties the uprights together and establishes the base structure
- Top shelf level next — locks the upright height and establishes the frame's working envelope
- Intermediate levels — add at desired heights after the frame is stabilized
Insert beams or clips firmly into upright holes and confirm each is fully seated and locked before moving to the next level. A beam that looks seated but isn't will shift under load. For teardrop-style pallet rack, engage safety pins at every beam connection.
Verify beam elevation accuracy at each level before proceeding — incorrect heights are difficult to adjust once the structure is loaded and in operation.
Bracing and Connecting Multiple Bays
With the frame leveled and beams confirmed, bracing locks the structure against lateral movement before load is applied. Key steps:
- Bolt rear sway braces to upright columns at positions specified in the manufacturer's hole-count chart — count holes from the base; don't estimate
- Install tie-clips between adjacent bays at the top and, in taller units, at intermediate points
- In adder configurations, the shared upright is structural for both bays — install and torque all bracing at that column before treating the adjacent bay as independently stable
Anchoring to the Floor
Floor anchoring is not optional for industrial shelving in most applications. UNARCO specifies one anchor bolt per column, ½-inch diameter, with 2½-inch nominal embedment as the standard for normal-duty rack absent special anchoring details. Penco pallet rack uses ½-inch diameter x 3¾-inch concrete floor anchors.
Steps for correct anchoring:
- Confirm the upright is plumb in both the cross-aisle and down-aisle directions before drilling
- Drill to the required hole diameter and depth using a hammer drill with a concrete bit
- Install the anchor bolt and tighten to the anchor manufacturer's torque specification — not beyond it
- Over-torquing is as problematic as under-torquing; it can fracture the concrete around the anchor
All uprights must be fully plumb before fasteners are tightened to final torque. Anchoring a misaligned upright locks the error into the structure permanently.
Post-Installation Checks and Validation
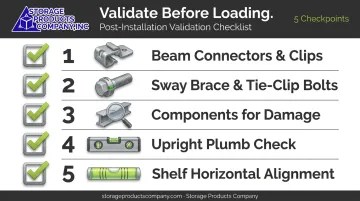
A shelf can look correctly assembled and still have unseated connectors, undertightened bolts, or misaligned uprights that only reveal themselves under load. Validate before loading — not after.
Visual and Structural Checks
Go through every connection point systematically:
- Beam connectors and clips — confirm fully seated and locked; no play or visible gap at the upright connection
- Sway brace and tie-clip bolts — tightened to manufacturer torque spec
- Components — no deformation or damage from installation (bent clips, cracked welds, dented uprights)
- Uprights — verify vertical in both directions using a spirit level
- Shelves — confirm horizontal; the unit should not lean or rock under manual pressure
If shimming is needed to correct an uneven floor, it must be done before final anchor tightening. Frazier's installation manual limits total shim thickness to no more than six times the diameter of the largest anchor bolt used at that plate.
Functional and Load Rating Checks
- Manually test each shelf clip — it should engage and hold without play
- For teardrop rack systems, verify safety pins are engaged at every beam
- Push the unit laterally with moderate manual force — it should not shift at the base
- Confirm anchor bolts are fully secure
Load capacity signage is required before the system enters service. Per ANSI MH16.1 (as cited by RMI), load plaques must be at least 50 square inches and display the maximum permissible unit load, maximum total load per bay, and maximum uniformly distributed load per storage level — all sourced from the manufacturer's documentation. Storage Products Company's rack inspection service flags missing or illegible load-capacity signage as a compliance failure.
Common Installation Problems and How to Fix Them
Most installation problems trace back to a short list of recurring mistakes — each one fixable, but easier to catch early than after the unit is loaded.
Uprights Not Plumb
The assembled unit leans or sits visibly out of vertical — usually because side braces were fully tightened before final plumb was confirmed, or the floor is uneven.
Fix: Loosen the brace bolts, re-plumb the upright in both directions with a spirit level, insert shims under the footplate if the floor is the culprit, then re-tighten all fasteners to the manufacturer's torque spec.
Beams or Clips Not Seating Correctly
Beams that won't sit flush or clips that feel loose after seating almost always point to one of two causes: mismatched components (the connector style doesn't match the upright slot pattern) or debris in the connection holes.
Fix:
- Verify compatibility against the manufacturer's parts list
- Clean all connection points before re-seating
- If parts are mismatched, contact the supplier before proceeding — forced connections fail under load
Anchor Bolts Failing to Hold
Anchor bolts that spin freely, pull out, or crack the concrete during tightening indicate one of three problems: the slab is too thin or deteriorated, the hole depth is insufficient, or the anchor was over-torqued.
Fix: Follow the anchor manufacturer's torque spec exactly — not the general fastener guidance, the spec for that anchor. If the slab itself is inadequate, stop and consult a structural engineer. This is a hard stop. A slab that can't support anchor loads creates a collapse risk that tightening alone won't fix.
Pro Tips for Installing Industrial Shelving Effectively
Complete one full bay before moving to the next — uprights, bracing, beams, and anchoring. This establishes a plumb reference point for the entire run and prevents cumulative alignment drift across multi-bay installations.
Document every stage. Proper records protect against liability and support warranty claims if issues arise later:
- Photograph bracing positions, anchor bolt placements, and bolt torque checks as you go
- Retain the manufacturer's installation manual on-site throughout the project
- Have a second person formally inspect and sign off before the system is loaded
Know when to bring in a specialist. For systems that fall into any of these categories, self-installation carries risk that professional installation eliminates:
- High-bay or high-load applications (heavy manufacturing, bulk storage, pallet rack above standard heights)
- Multi-level or structurally connected shelving systems
- Seismic anchoring requirements in applicable jurisdictions
- Any configuration requiring PE-stamped drawings or building permits
Storage Products Company's factory-recommended, insured installation teams handle these scenarios while maintaining compliance and protecting warranty coverage — including Frazier's Two Year Pallet Rack Damage Warranty, which is tied to proper installation.
Frequently Asked Questions
What is the standard depth of industrial shelves?
Industrial shelving typically ranges from 12 to 48 inches deep, depending on system type. Penco's rivet shelving runs 12–36 inches; wide-span shelving goes up to 48–50 inches. The right depth depends on the size of stored items, how they're accessed, and whether the unit is freestanding or wall-mounted.
How much does industrial shelving installation cost?
Costs vary widely based on system type, number of bays, and whether you're using professional or in-house labor. Light-duty boltless shelving systems are far less expensive to install than multi-bay pallet rack with anchoring and permit requirements. A project-specific quote is the only reliable way to budget accurately.
How much weight can an industrial shelf hold?
Capacity ranges widely — from around 350–1,500 lbs per shelf for boltless rivet shelving to 45,000+ lbs per frame for heavy-duty pallet rack. Always use the manufacturer's documented load ratings for your specific configuration. Published specifications, not ballpark figures, are the only safe reference.
Do you need to be qualified to install racking?
No universal federal license is required, but OSHA and RMI guidelines strongly recommend installation by trained, qualified personnel with relevant experience. For larger or higher-load systems, using certified or factory-recommended installers is best practice — and is often a warranty condition.
Do you need to anchor industrial shelving to the floor?
Yes, in the vast majority of industrial applications. RMI standards require all rack columns to be anchored per design documents, and OSHA has cited unanchored racks under the General Duty Clause. Anchoring prevents tip-over under load or impact — it's not a formality, it's the last line of defense against collapse.