The consequences of doing it incorrectly are real. OSHA accident report 170137.015 documents a September 2024 fatality where a warehouse employee removing wire mesh shelving from a second level fell through a gap to a concrete floor — a fatal outcome from what appeared to be a routine teardown task.
This guide covers the correct step-by-step disassembly sequence, what to prepare before you start, the most common mistakes that cause damage or injury, and how to decide whether to handle the job in-house or bring in professionals.
Key Takeaways
- Clear all loads first — every level, including upper bays only accessible by forklift
- Remove beams top to bottom, never bottom-up — lower beams must stay in place until upper steel is down
- Anchor removal is the most technically demanding step and typically requires concrete patching afterward
- Photograph the layout and bag all hardware before anything moves — unlabeled components create costly reinstallation problems
- High-bay, drive-in, and push-back systems carry higher risk — these are generally best left to trained, insured professionals
How to Dismantle Pallet Racking: Step-by-Step
Step 1: Clear All Loads and Establish a Safety Perimeter
Before touching any structural component, confirm that every shelf level is completely empty — including upper levels only reachable by forklift. Partial loads on upper beams shift weight in unpredictable ways once lower connections are disturbed.
Set up physical barriers (caution tape, cones, or temporary fencing) around each bay being worked. Keep non-essential personnel out of the hazard zone for the entire duration of the teardown, not just the first few minutes.
Step 2: Remove Wire Decking and Accessories
Start at the highest levels and work downward. Slide out wire decking panels and nest them alternating face-up and face-down — this prevents bowing and reduces the floor space required for staging.
Collect all small hardware immediately:
- Beam safety clips and locking pins
- Shelf dividers and row spacers
- Column guards and post protectors
- Bolts, washers, and any loose fasteners
Put everything in labeled bags as you go. Loose fasteners disappear quickly on a busy teardown floor and are expensive to replace.
Step 3: Remove the Beams
This step follows the reverse logic of manufacturer assembly — standard manufacturer assembly guides (per RMI/ANSI MH16.1 practice) describe beam installation bottom-up, which means teardown runs top to bottom.
The sequence matters:
- Disengage beam safety clips or locking pins at the highest level (a rubber mallet tap releases most teardrop-style connectors)
- Remove and lower each beam with one person stabilizing the upright frame
- Stack removed beams flat, grouped by size and length — never upright or at angles
- Repeat level by level downward, leaving the lowest beam in place until uprights are ready to come down
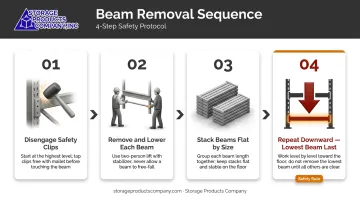
Never remove beams starting from the bottom. It destabilizes the upright frame immediately and is one of the most common causes of teardown collapses.
Step 4: Lower and Remove Upright Frames
Only remove the final (lowest) beam level when a second worker is positioned to stabilize the now free-standing upright. An unsupported upright frame is top-heavy and unstable — never leave one unattended, even briefly.
Once the last beam is out:
- Unbolt the baseplate nuts and washers from the floor anchors
- With both workers in position, carefully tilt and lower the upright frame onto its side in a controlled motion
- Do not drop it or lean it against other racks
For taller uprights, OSHA 29 CFR 1910.28 requires fall protection when workers are on walking-working surfaces 4 feet or more above a lower level, and OSHA 29 CFR 1910.30 requires fall-hazard training before exposure.
Manual handling alone becomes inadequate as frame height increases. Use a forklift attachment or scissor lift to control descent on larger systems.
Step 5: Remove Floor Anchors and Repair Concrete
Wedge anchors and sleeve anchors are engineered for permanent embedment — neither type comes out cleanly, so plan for one of two removal approaches.
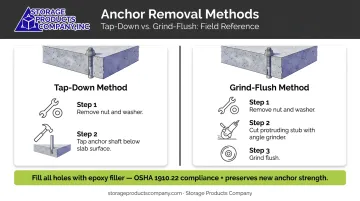
Standard removal approach (per Simpson Strong-Tie guidance):
- Remove the exposed nut and washer first
- Tap the remaining anchor shaft deeper into the pre-drilled hole if clearance exists below the slab surface
- If no downward clearance exists, cut the protruding stub with an angle grinder and grind it flush
After anchor removal, fill all residual holes with epoxy filler or concrete sealant. The requirement goes beyond cosmetics — OSHA 29 CFR 1910.22 requires walking-working surfaces to be maintained in safe condition, and unfilled holes near future anchor placements can reduce new anchor holding strength by up to 20% if located within 2 inches of a new installation (per Simpson Strong-Tie testing data).
Inspect surrounding concrete for cracking or spalling before the area is used for new racking or forklift traffic.
Step 6: Bundle, Label, and Stage All Components
Disassembled rack components of the same brand look nearly identical once they're on the floor. Sorting now prevents serious problems at reinstallation.
Group and secure by type:
- Uprights stacked together, bundled with heavy-duty steel banding straps
- Beams grouped by length, banded in uniform bundles
- Wire decking nested in stacks
- All hardware in labeled bags by component type
- Photographs of the rack configuration documenting bay dimensions, beam heights, and accessory placement
Storage Products Company's relocation teams treat systematic labeling and photographic documentation as non-negotiable steps — the photos resolve compatibility questions on the reinstallation side before they become delays.
What You Need Before You Start
The quality of your prep work directly shapes how safely and efficiently the teardown goes. Missing a tool mid-job or skipping a pre-check is how disassembly jobs turn into incident reports.
Tools Required
| Item | Purpose |
|---|---|
| Rubber mallet | Release teardrop beam connectors |
| Socket wrench set with extensions | Baseplate nuts, bolted connections |
| Pry bar | Freeing stubborn beams or base plates |
| Angle grinder or reciprocating saw | Anchor stub removal |
| Heavy-duty steel banding tool + strapping | Bundling uprights and beams |
| Scissor lift or forklift with operator | Required for uprights on taller systems |
Safety Gear and Zone Preparation
Required PPE for all workers:
- Hard hat
- Steel-toed boots
- Cut-resistant work gloves
- Safety glasses
- High-visibility vest if near active forklift lanes
Under OSHA 29 CFR 1910.132, employers must assess hazards and provide PPE training — not just hand out equipment. Brief the full team on the work sequence and emergency procedures before a single component moves.
Know Your Rack Type
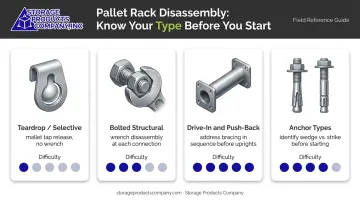
The connection type determines how beams release:
- Teardrop/selective racks — gravity-fed beam connectors release with a mallet tap; no wrench needed
- Bolted structural racks — require wrench disassembly at each connection point
- Drive-in and push-back systems — have additional lateral bracing that must be addressed in sequence before uprights can be lowered
- Anchor type (wedge vs. strike) — identify this before you start; some facilities require a concrete repair plan or facilities management notification before anchor removal begins
Common Mistakes That Cause Damage or Injury
- Removing beams out of sequence — starting from the bottom shifts load distribution unpredictably and is one of the most frequent causes of upright frame instability during teardown
- Working alone on uprights — upright frames are top-heavy and require at least two workers to lower safely — on taller systems, mechanical support is still needed even with two people
- Skipping concrete repair after anchor removal — exposed stubs and unfilled holes create OSHA-reportable trip hazards, open liability exposure, and weaken performance of any new anchors installed later
- Failing to label components — unlabeled parts from the same rack brand are nearly impossible to sort correctly later, leading to mismatched beam levels and avoidable replacement purchases
When Should You Dismantle Pallet Racking?
The most common triggers for a full teardown:
- Warehouse relocation or facility sale
- Floor plan reconfiguration for new equipment or workflow
- Rack system upgrade or brand replacement
- Full facility closure
Structural damage is a separate trigger entirely. RMI's Guidelines for the Assessment and Repair or Replacement of Damaged Rack (Version 2.0, 2020) sets the industry framework for damage assessment under ANSI MH16.1, and UNARCO's position is direct: remove loads immediately when damage is spotted.
Take the rack down when you're seeing:
- Bent uprights beyond manufacturer tolerances
- Significant rust or corrosion on structural members
- Missing safety pins across multiple bays
- Unrepaired forklift impact damage
On timing: schedule teardowns during low-activity windows — after hours, weekends, or between shipping cycles. Coordinate with receiving, shipping, and inventory teams before work starts.
Should You DIY or Hire a Professional?
Three factors drive this decision: total project scale, rack height, and whether your team is trained and insured for this type of structural work.
DIY Is Reasonable When...
- Fewer than 10–15 bays of low-profile selective rack
- At least one team member has prior rack disassembly experience
- Proper PPE is available for all workers
- Workers' compensation coverage explicitly covers this type of structural work
Hire a Professional When...
- Large warehouse, high-bay systems, or complex rack types (drive-in, push-back, rack-supported mezzanines)
- Your team lacks documented training or insurance coverage for structural disassembly
- The teardown is part of a facility relocation where components need to be reinstalled at a new location
Storage Products Company — based in Mobile, Alabama with 43+ years of material handling experience — provides integrated rack relocation services covering the full scope from teardown through reinstallation to RMI/ANSI MH16.1 specifications.
Their factory-approved, insured installation teams deliver:
- Component labeling and inventory tracking during disassembly
- Damage assessment that flags uprights and beams unfit for reinstallation — a step that directly prevents post-relocation collapse risk
- Replacement of unserviceable pieces with new or used components
- Phased scheduling options (after-hours, weekends) to keep your operations running during teardown
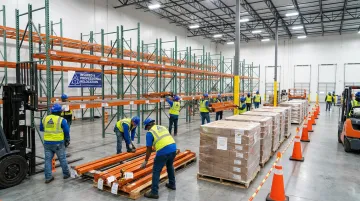
Relocating existing rack instead of buying new can cut capital costs substantially — but only if teardown and reinstallation are executed to the same structural standards as a new installation.
Frequently Asked Questions
Does OSHA require pallet racking to be anchored?
There is no single dedicated OSHA pallet rack standard, but OSHA enforces anchoring requirements through the General Duty Clause and 29 CFR 1910.176(b). RMI states that all pallet rack columns should be anchored per ANSI MH16.1, and OSHA citations have cited employers for unanchored racks as struck-by and crushed-by hazards — which is why anchor removal is a required step during teardown, not optional cleanup.
What is teardrop pallet racking?
Teardrop pallet racking is the most common selective rack style in U.S. warehouses. Beam end connectors engage teardrop-shaped holes in the upright columns, locking beams in place without bolts. During disassembly, releasing the locking device and lifting upward unseats the beam — typically with a mallet tap, not a wrench.
How much does a racking inspection cost?
Inspection costs vary based on system size, bay count, facility layout, traffic volume, and whether a rack engineer is involved. RMI recommends annual inspections at minimum, with higher-risk areas inspected more frequently. A pre-teardown inspection can also identify which components are safe to reuse — often offsetting its own cost.
Can pallet racking components be reused after dismantling?
Most components can be reused if they are undamaged, properly labeled during teardown, and stored correctly. Bent uprights, cracked welds, permanent beam deformation after unloading, or missing safety pins are disqualifying — those components should be replaced, not reinstalled.
How long does it take to dismantle pallet racking?
It depends heavily on bay count, rack height, anchor type, and team size. A small selective rack system may take a few hours with two experienced workers; a large warehouse system with high-bay racking and complex anchor conditions may require multiple days with a professional crew.
How do I determine racking load capacity?
Load capacity is typically stamped on the manufacturer's load placard mounted to the upright frame. Per RMI, ANSI MH16.1 requires load plaques to display the maximum uniformly distributed load per level, average unit load, and total compartment load. If the placard is missing or damaged, contact the original manufacturer or a qualified rack engineer before reinstalling components in any configuration.